Mounting Set for the ZWO ASIAIR Pro and a Guiding Scope with a EAF-Based Belt Drive for Lenses and Telescopes with a Focus Ring
A flexible way of setting up and use motorized focusing

How come?
Page Contents
This is a set of mounting components for astrophotography rigs using lenses and telescopes with a focus ring. It provides a compact and flexible mounting of most important elements of the rig and allows using a range of lenses and telescopes in the same installation. The set is based on the experience made in arranging major components of a DSLR-based rig over a long period of time. The set provides a solution for using the ZWO EAF with a belt drive for motorized focusing of DSLR lenses.
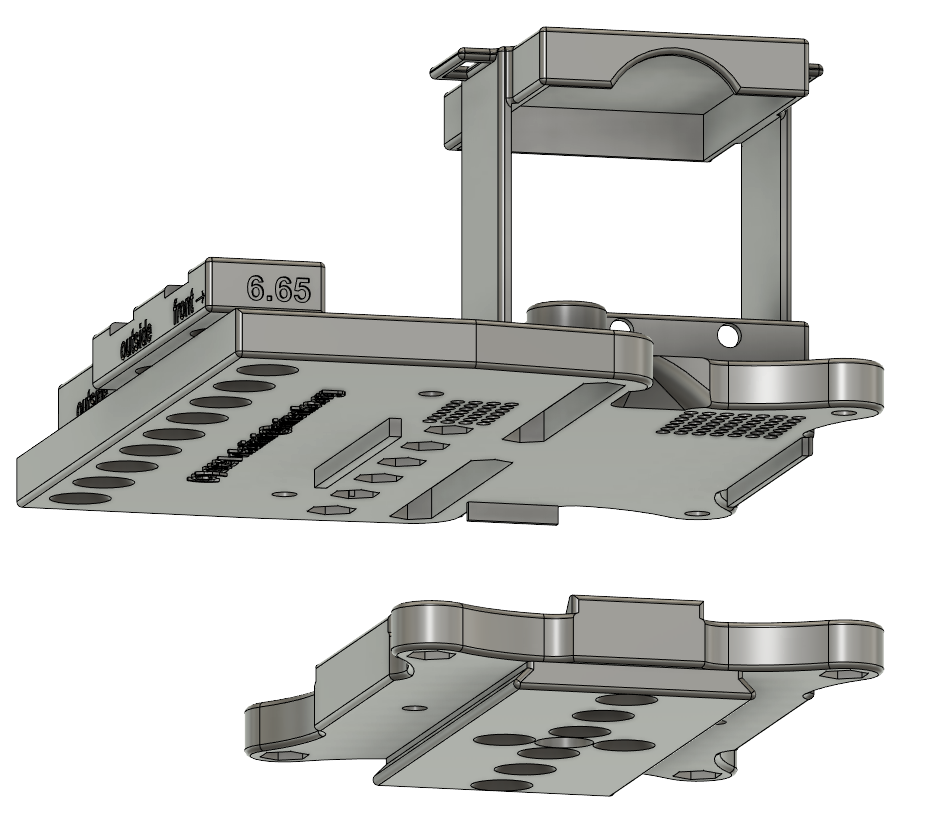
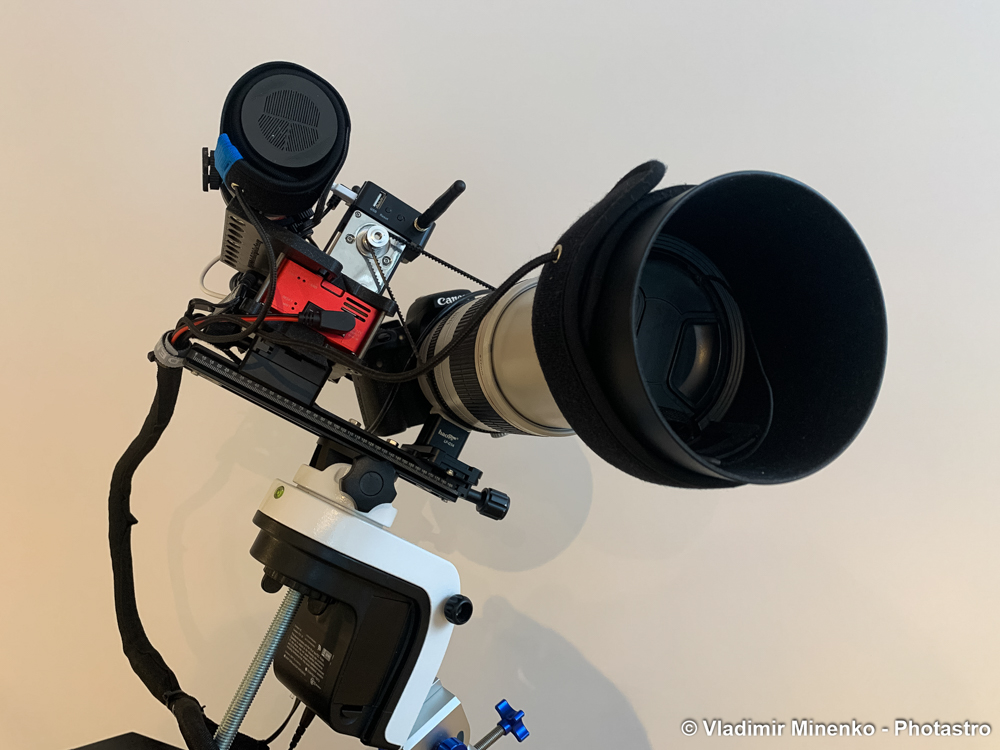
The set brings the ZWO ASIAIR Pro, the ZWO EAF and a guiding scope into one integrated control unit. In this unit, the ASIAIR Pro is attached to an arca-swiss style dovetail plate which is mounted into a clamp sitting on the main rail bar. The main camera and the telescope are attached to the other side of the main rail bar. EAF and a guiding scope are placed on top of the ASIAIR pro.
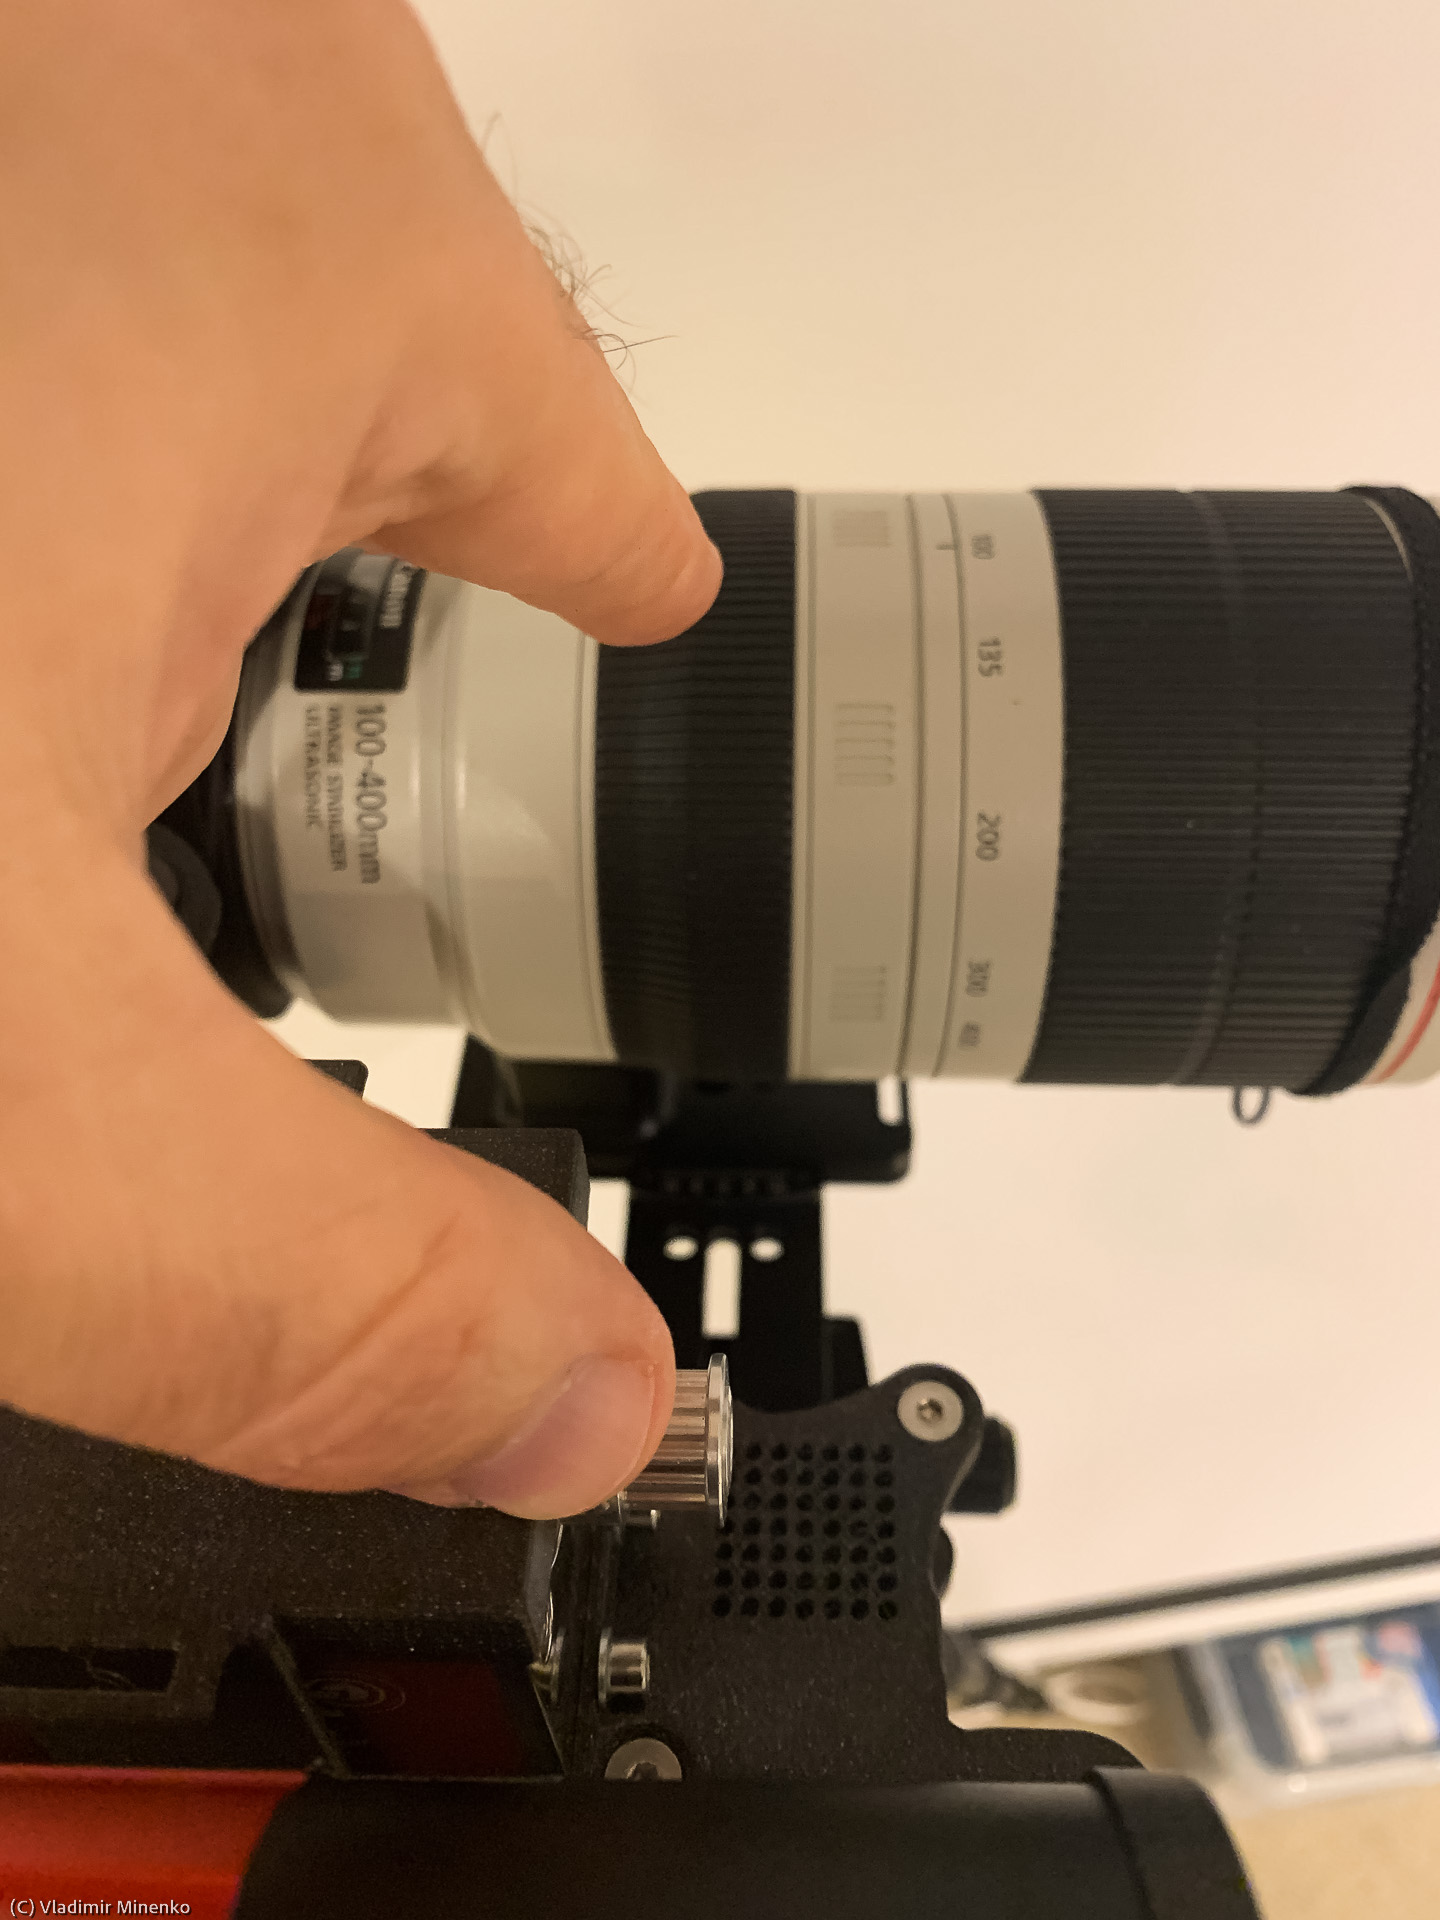
A pulley and two belts are provided with the set for the EAF. The allows using the EAF to drive a focus ring in addition to other focus mechanisms supported by the EAF. The teeth stepping of the pulley and the belts has been tailored for Canon lenses, but it can be used with many other lenses as well. The set uses two sliding mechanisms to adapt the position of the EAF to various positions of the main camera with an attached lens or telescope along the main optical axis. Additionally, the distance from the mounted block to the focus ring can be adjusted by using belts of different length as well as by sliding the block clamp along the main rail bar. This allows using the set with a wide range of lenses or telescopes as long as they have a focus ring.
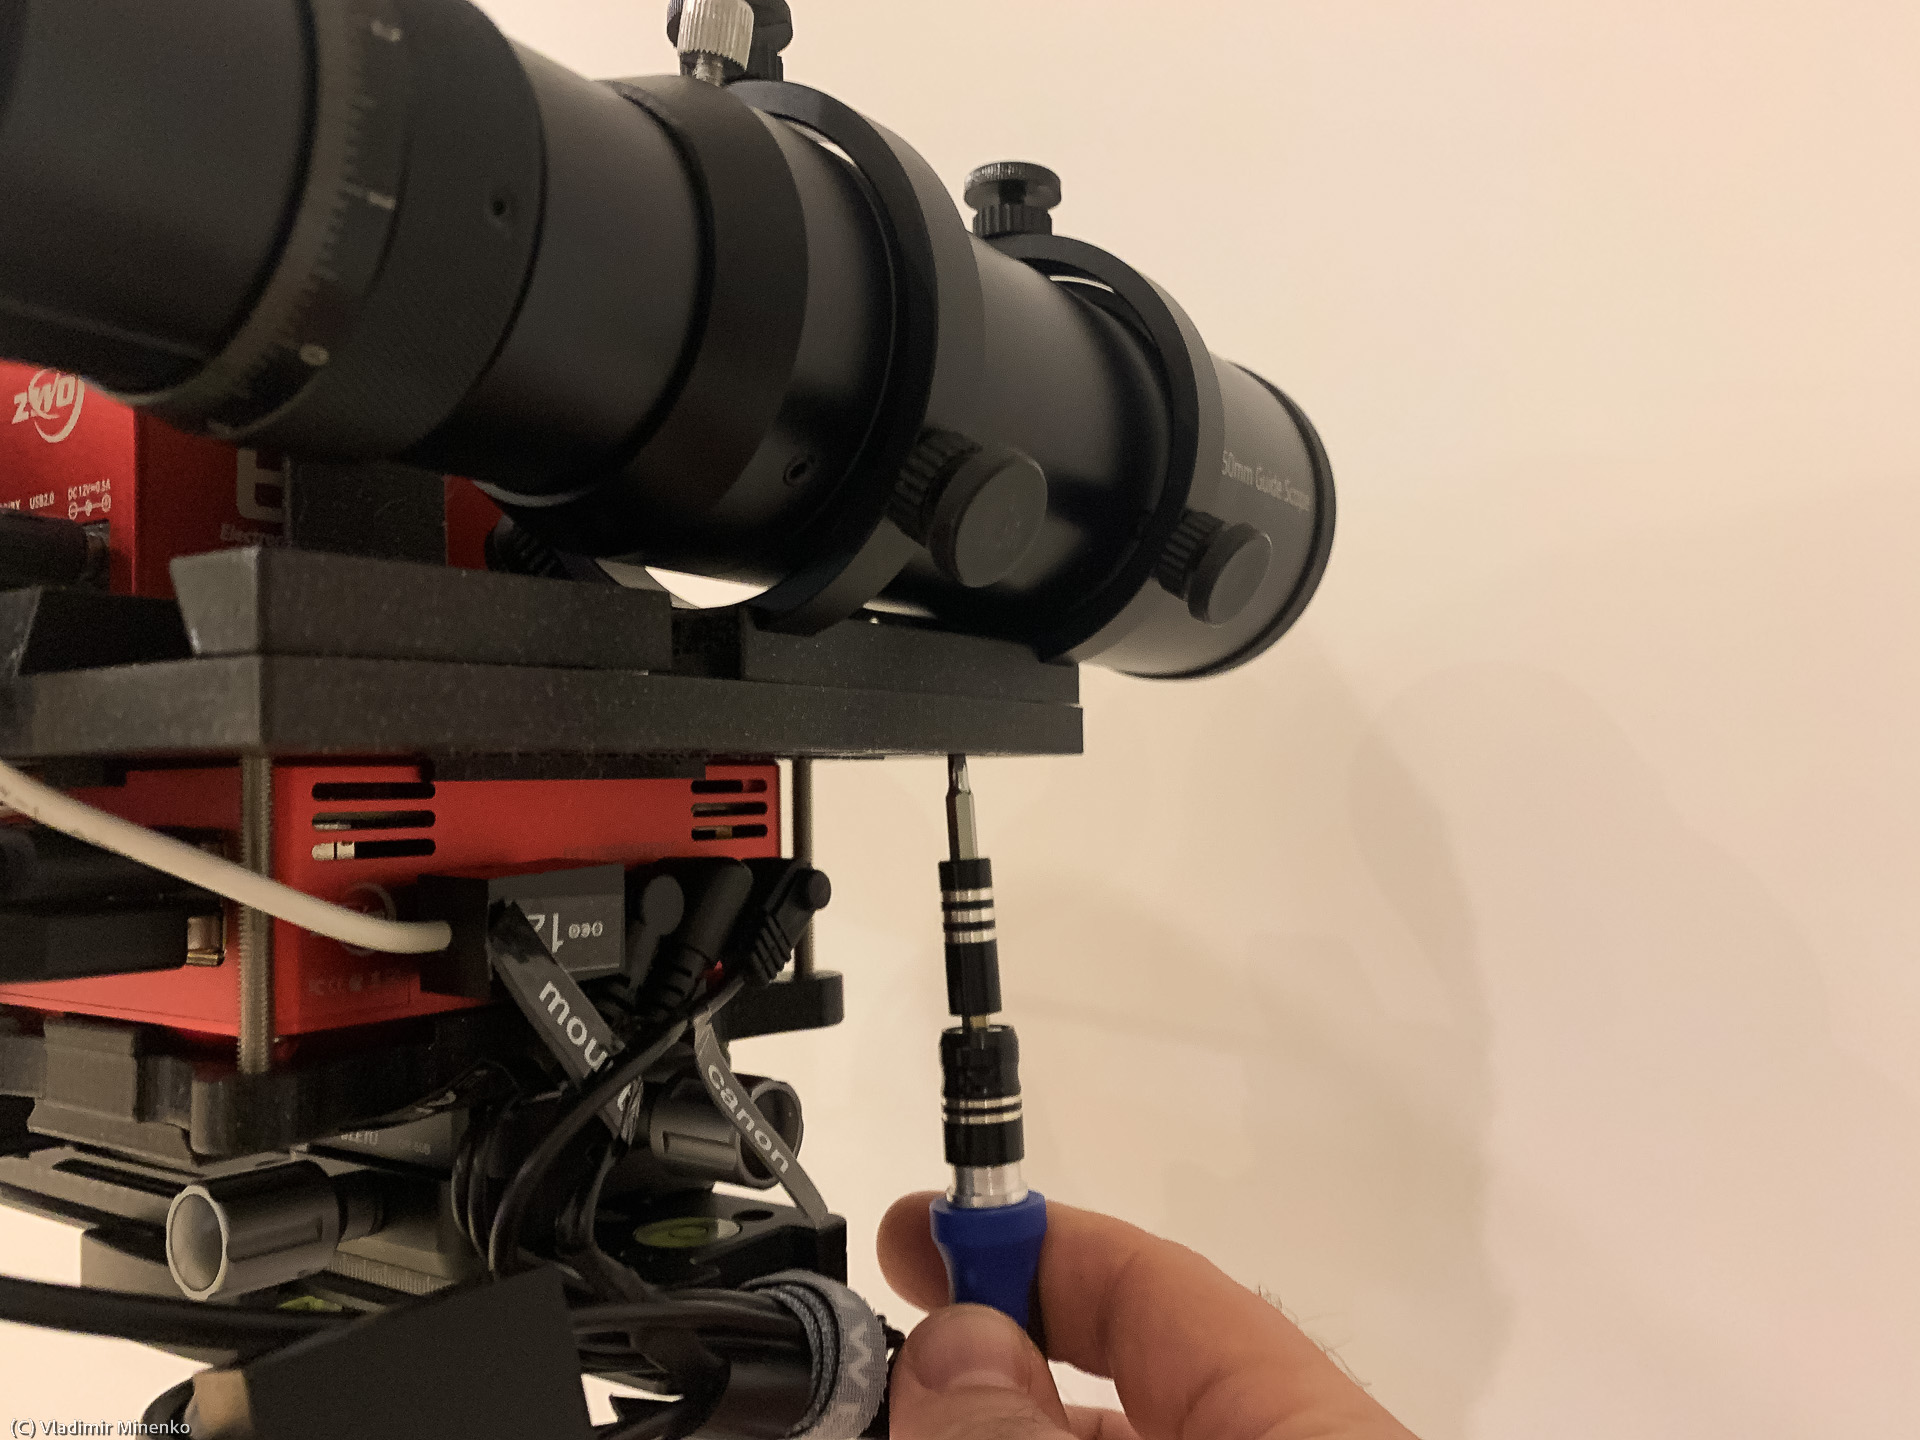
The set supports mounting of a mini guide scope such as ZWO Mini Guide Scope, SVBONY SV165 Mini Guide Scope , or Angeleyes 30mm f/4 Mini Guide Scope on the Vixen-style dovetail foot. For this, two clamps are included in the set.
Unfortunately, the width of the Vixen-style dovetail foot varies a lot. The above scopes fit well. The minimal with of the bottom plate of the foot is 31mm.
Larger guide scopes can be mounted as well. In order to keep the compact size of the rig, these scopes should be mounted directly with their adjustment rings. Various mounting holders are available. For example for SVBONY SV106 60mm, SVBONY SV106 50mm, TS-Optics Deluxe 60 mm guiding scope and other no-name 50mm and 60mm guiding scopes. Both SVBONY guide scopes use the same SVBONY SV116 guiding scope rings which have the width of 15mm. These rings are certainly supported as well if you use them with a different guide scope. Additionally, the StarPal Finder Scope 50mm and 60mm rings and Angeleyes 60mm rings are supported. Their width is 10mm. The SVBONY guide scopes seem to be the same as most other 50mm and 60mm no-name guide scopes sold on Internet and various shops. The 15mm rings seem to be most popular and the holder for this rings is provided by default.
The larger guide scopes can be mounted on different positions using the same range of holes in the top mounting plate as the Vixen-style clamps. Please note, that if you use large adjustment rings with large adjustment screws, these rings might not fit since they will touch the EAF. Rings mentioned above fit well.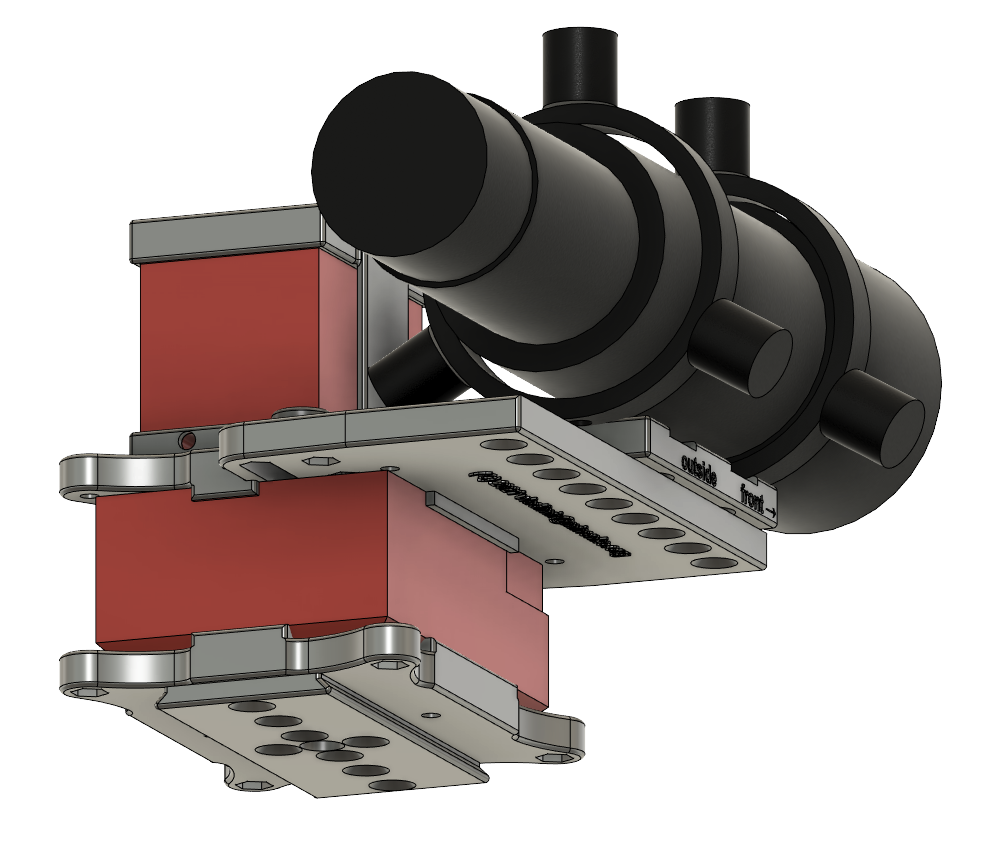

Quite some people use a WiFi router to extend the WiFi range of ASIAIR Pro. The mounting set provides a part covering EAF from the top. This part includes two eyelets for fixing a WiFi router on top. Optionally, there are adapters for popular routers. 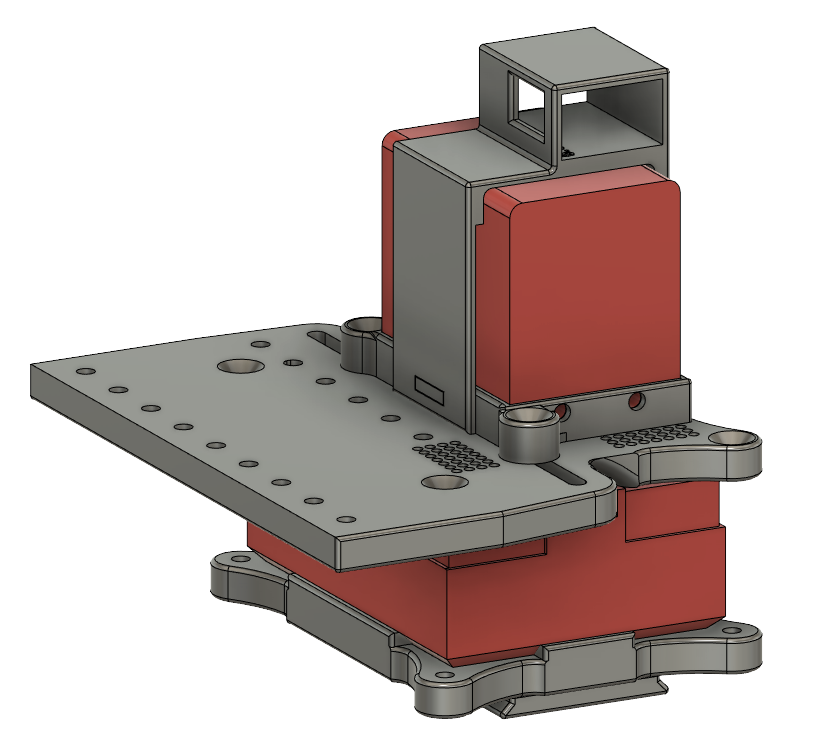

Availability
The set is available in my shop or on eBay if you prefer.
The Content of the Set

The mounting set:
- multiple 3D-printed parts
- 12x M4 nuts
- 12x M4x14mm screws
- 2x M4x16mm screws
- 2x M4x8mm screws
- 4x M4x50mm screws
- 1x pulley
- 2x belts, a larger and a smaller one
- ~50cm hook-and-pile fastener (also known as “velcro” (R) fastner)
- a set of allen keys
When ordering please provide the diameter of focus rings of lenses and telescopes you would use as well as the type of the camera you would use. This is needed to estimate the size of the belts which will be included of the package. Later on, you can add other belts on your own. The belts are standard T2,5 6mm wide belts used in CNC machines and 3D printers. In my set, I use 420mm belt with the Canon 800D and three different Canon lenses. You will get two different belts which will most probably fit your setup. The the page Using the ZWO EAF for a Belt Driven Motorized Focusing of Canon Lenses for more details about the belts.
It looks so when packaged:
Please note that the updated version for the ZWO ASIAIR Plus does not contain the EAF cover and has different dimensions.
Not included
But needed components to finish the setup!
The set uses arca-swiss style mounting which is provided by the arca-swiss style dovetail plate as a part of the set. The reason for this is to allow flexible positioning of the control unit (mounted with the set) and the main camera. The control unit should be placed in an arca-swiss clamp sitting on a main rail. The the suggested setup (the control unit, and the main camera with a lens or a telescope) are placed on another side of this main rail.
This rail and clamps are not provided. Here are some suggestions what you can use. The above picture shows a Losmandy plate with am arca-swiss rail and two clams: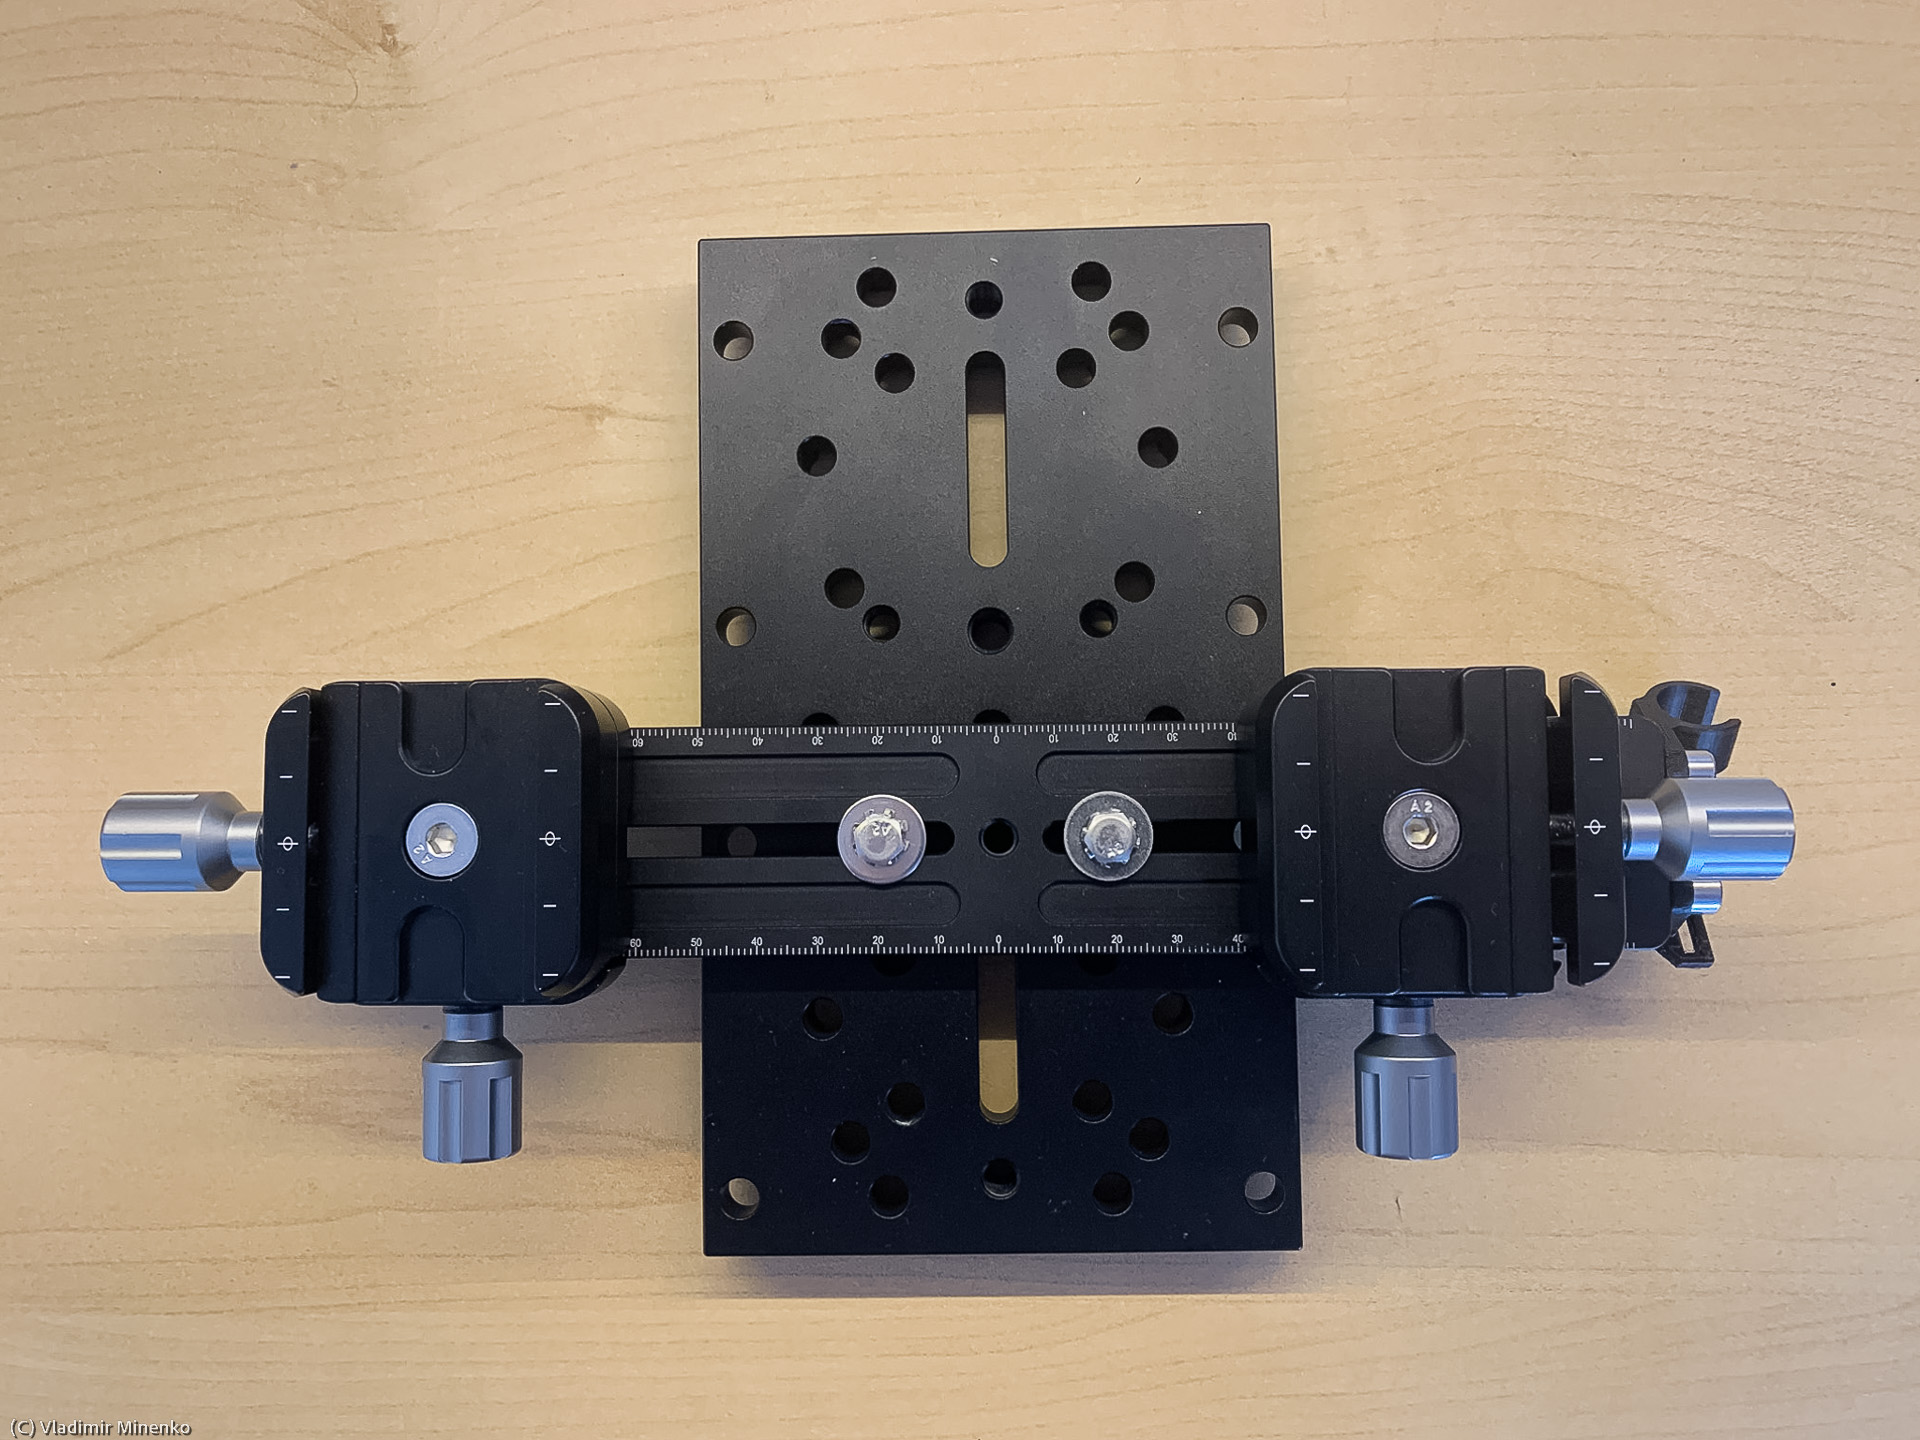
This can be used on a larger mount, like Sky-Watcher EQ6-R Pro. I use another rail with an integrated clamp mounted on a Vixen-GP-style dovetail base:
If you like to resemble the suggested way of mounting, you need the following or similar parts:
The first variant uses:
- One iShoot Quick Release Plate QS-220
- Two XILETU QR-50B Tripod Head Clamps
The second variant uses:
- One XILETU QR-50B Tripod Head Clamp
- One XILETU NNR-200 Multifunctional Quick Release Plate Mounting Clamp
Earlier I used:
Other brands, like Neewer, iShoot, Andoer provide similar products. If you buy these components, pay attention that arca-swiss style rails (also called “release plates”) are double-sided, since the other side of the rail can be used to fix the rig directly on a mount or in an adapter. The above MENGS FNR-200 and XILETU NNR-200 rails contain an integrated clamp. This is handy and combination saves some weight and space. Otherwise you would need a second double clamp, like the XILETU QR-50B. Additionally, the MENGS FNR-200 and XILETU NNR-200 contain an eyelet on one end which can be used to fix cables.
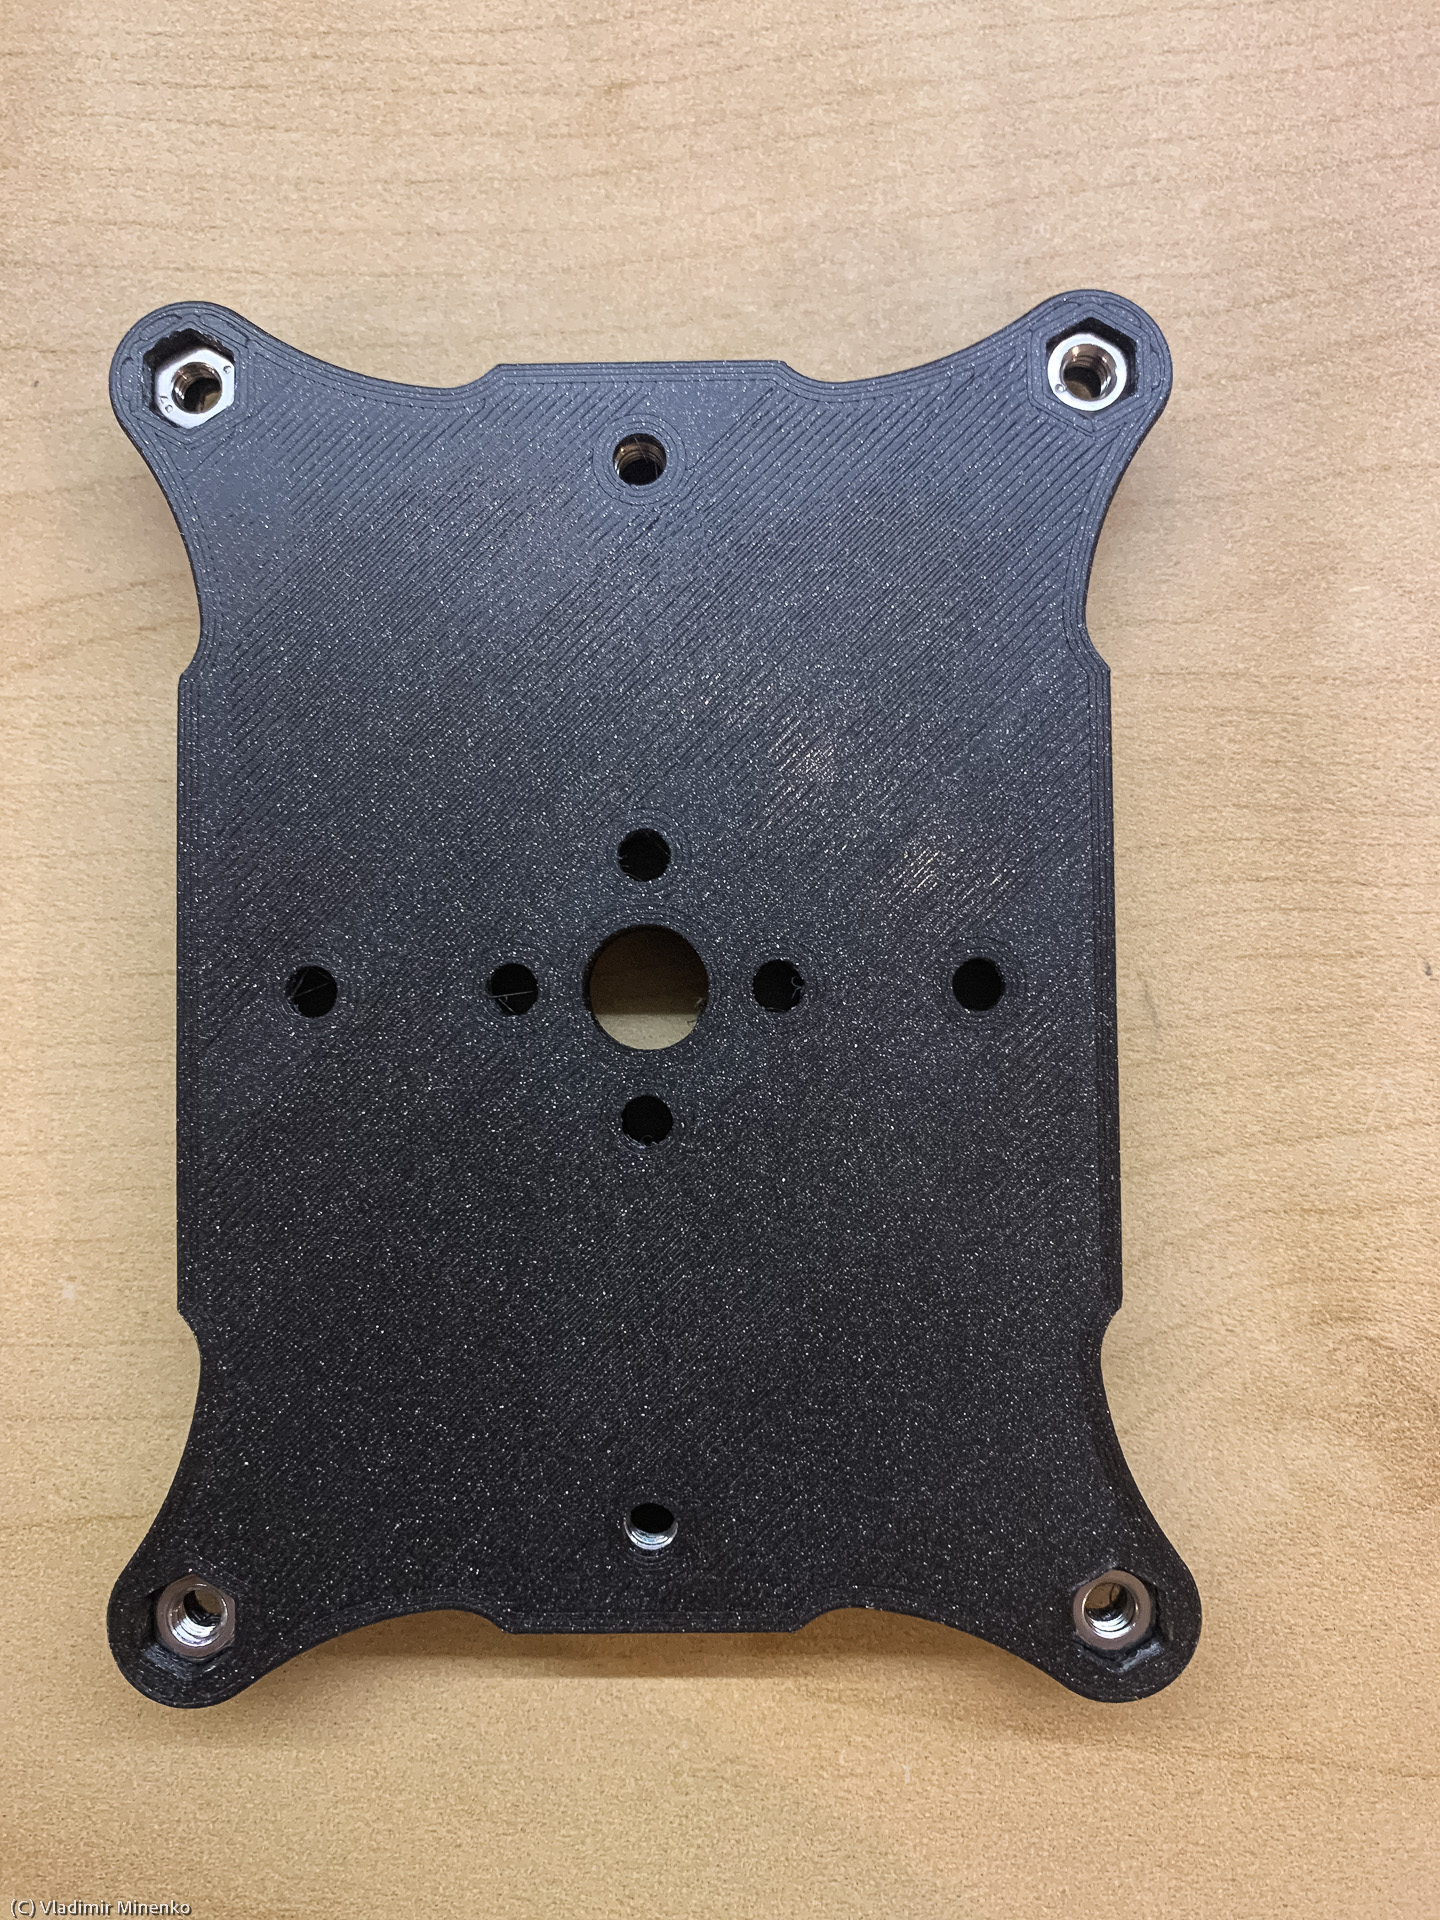
In case you have another approach for mounting, you can skip using the arca-swiss style dovetail plate provided in this set and use the original mounting holes on the bottom of the ASIAIR Pro. The bottom plate of the set has additional holes for this and so keep corresponding mounting holes still accessible.
Optional components
As mentioned above a WiFi router can be placed and mounted with the set. The set includes a hook-and-pile fastener and provides two eyelets for this. I found a few very compact routers, which fit very well. I have a few specialized adapters for these routers. Please contact me
if interested. I’m considering to offer a pre-configured upgrade set if there will be a broad interest. For now, use the provided hook-and-pile fastener to fix a WiFi router on top of the EAF.
Assembly steps
Note: On most places the 14mm screws are used, unless otherwise noted.
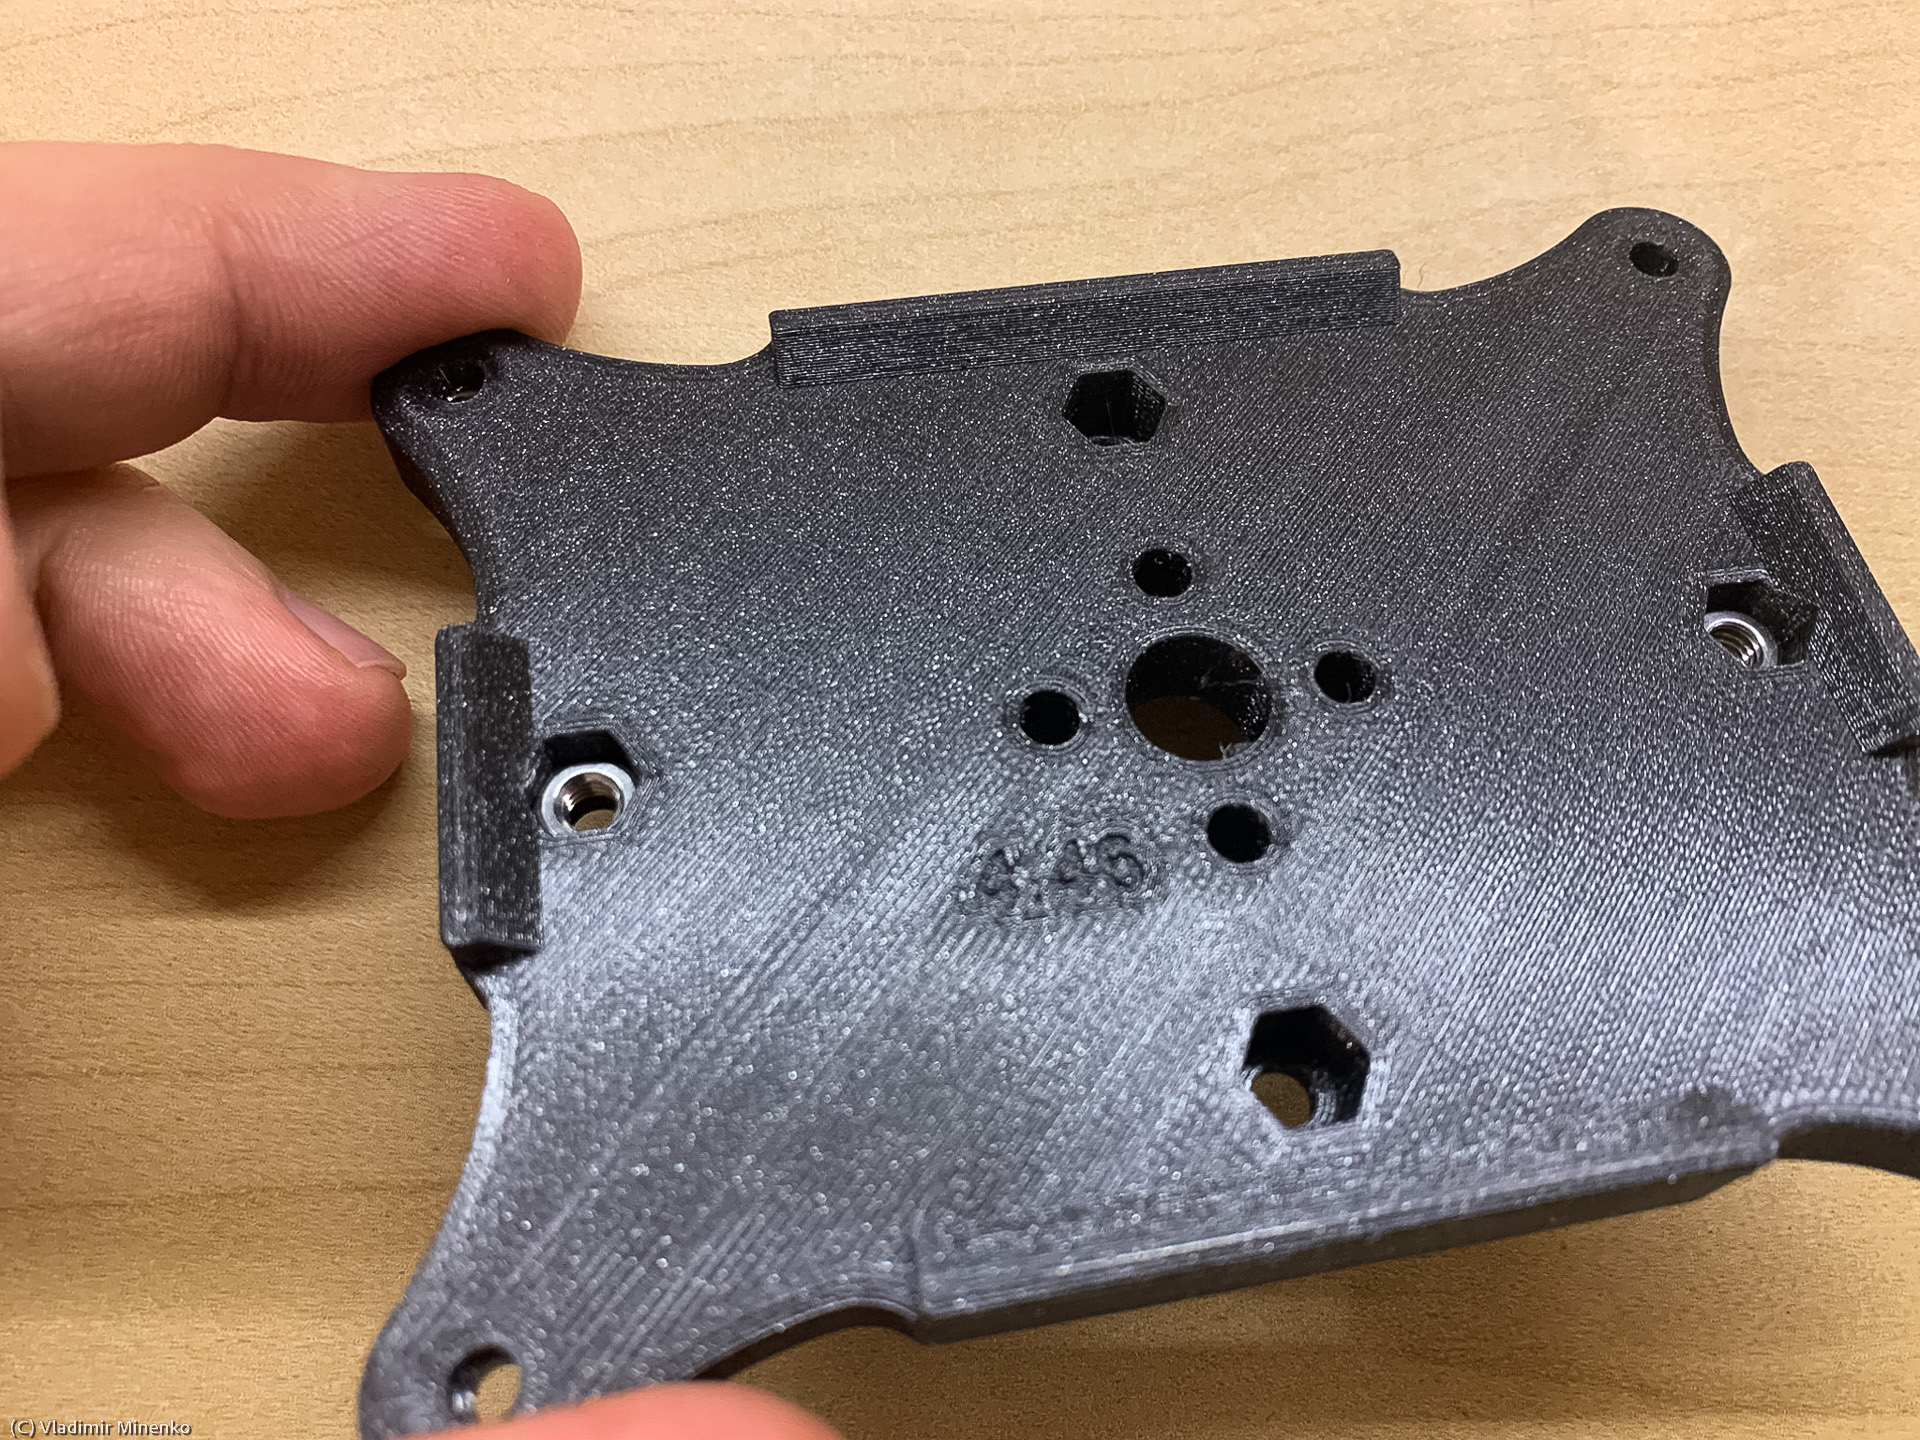
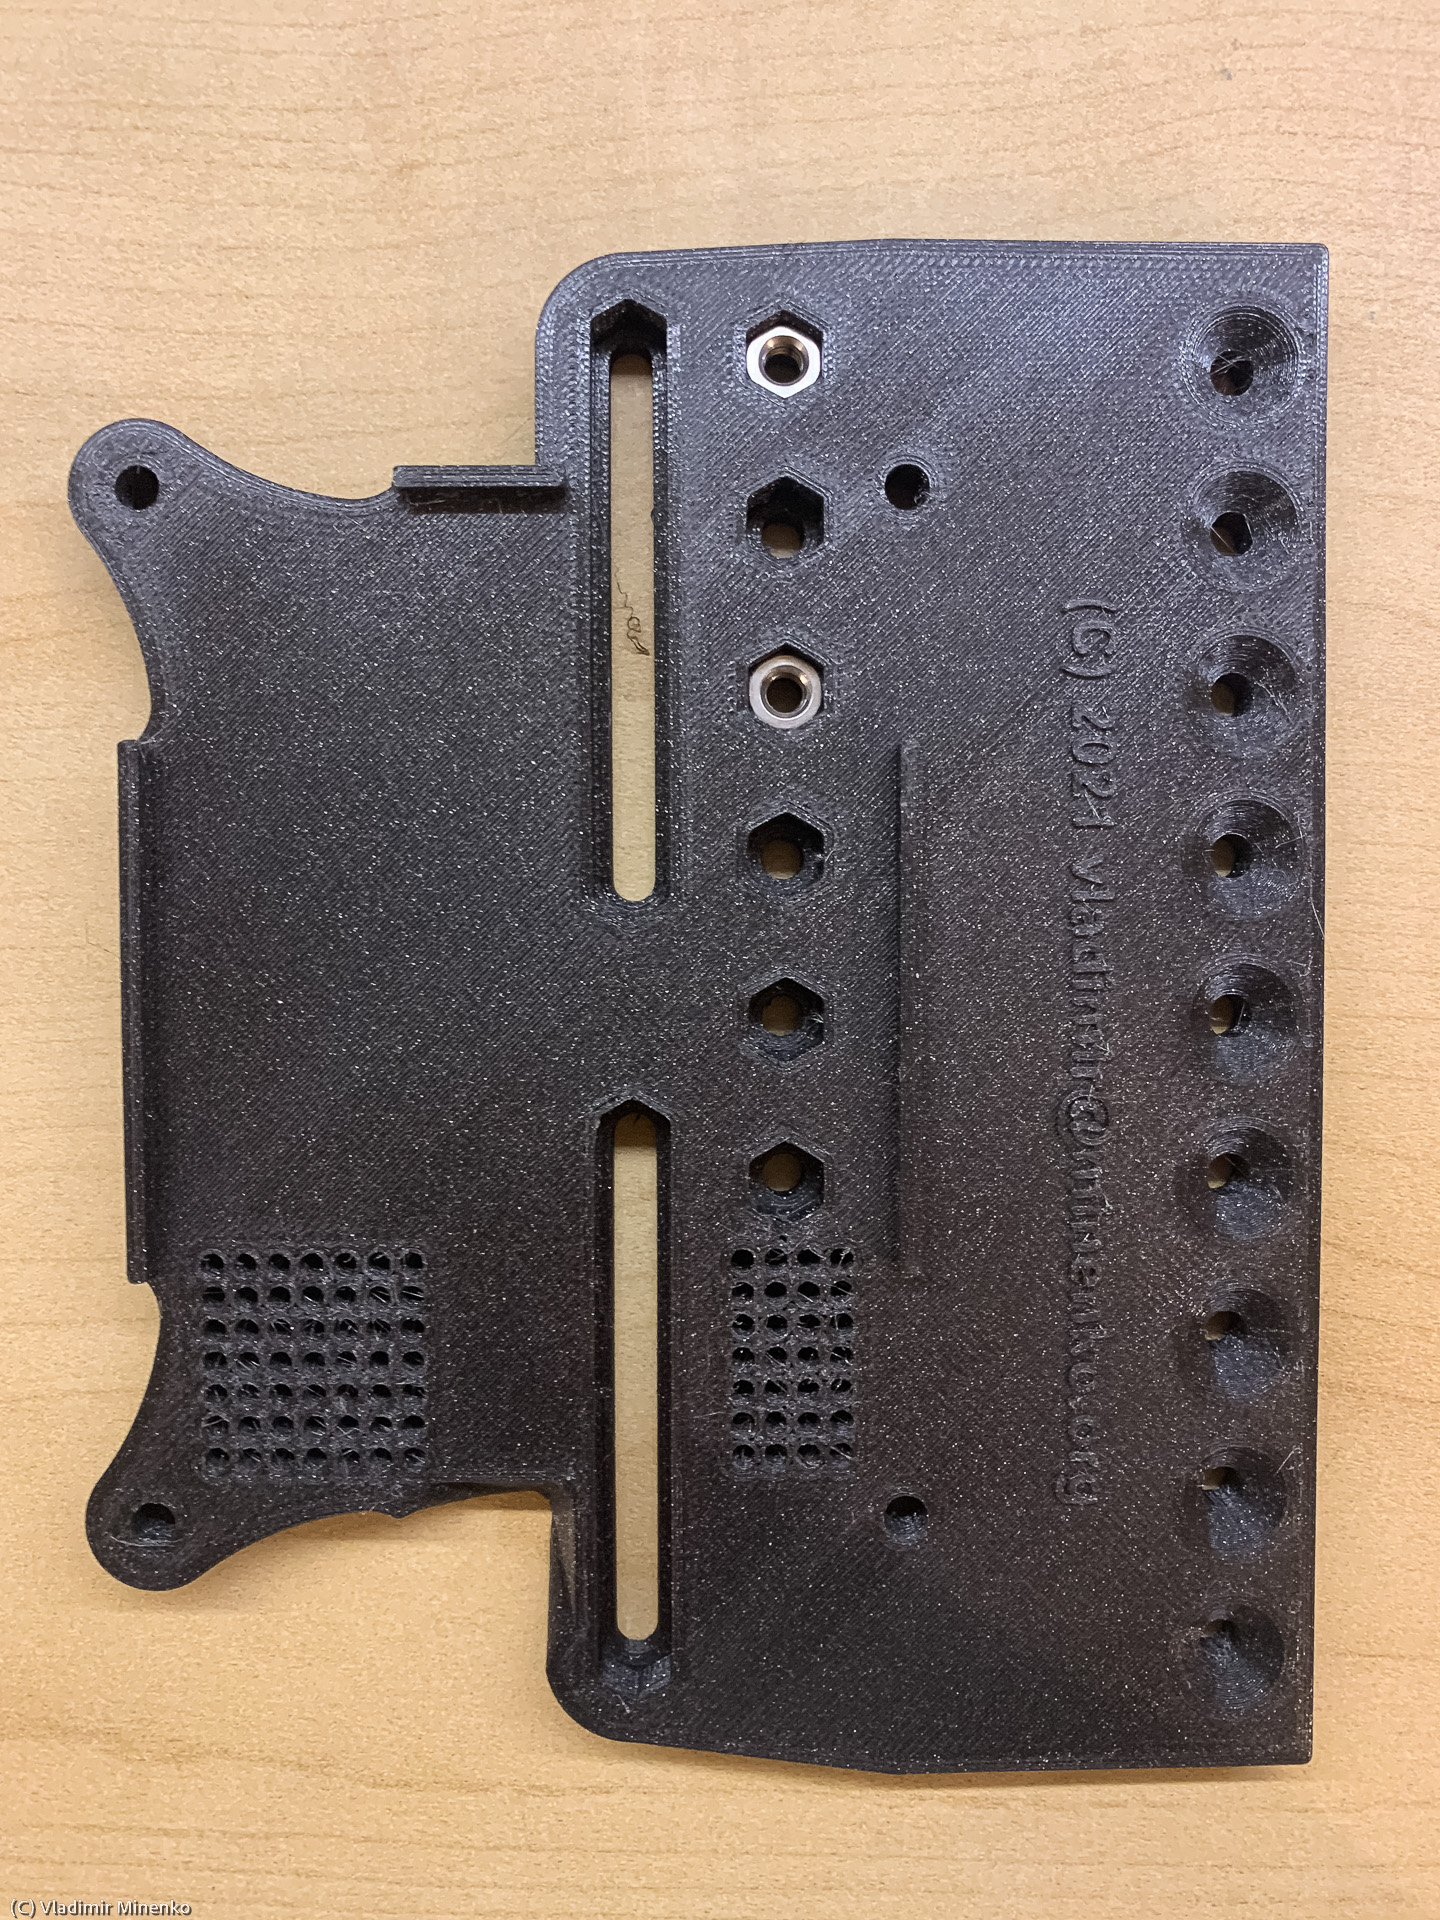
- You start assembling by placing the nuts into the holes on the bottom plate. Please note that the nut holes are made being tight so that nuts will stick in holes and not get lost when changing the configuration. Use a longer screw to push a nut in a hole. Nuts will be pulled to the final position when you tighten the screws. You have to place 4 nuts on the bottom side of the bottom plate.

and two nuts on the top side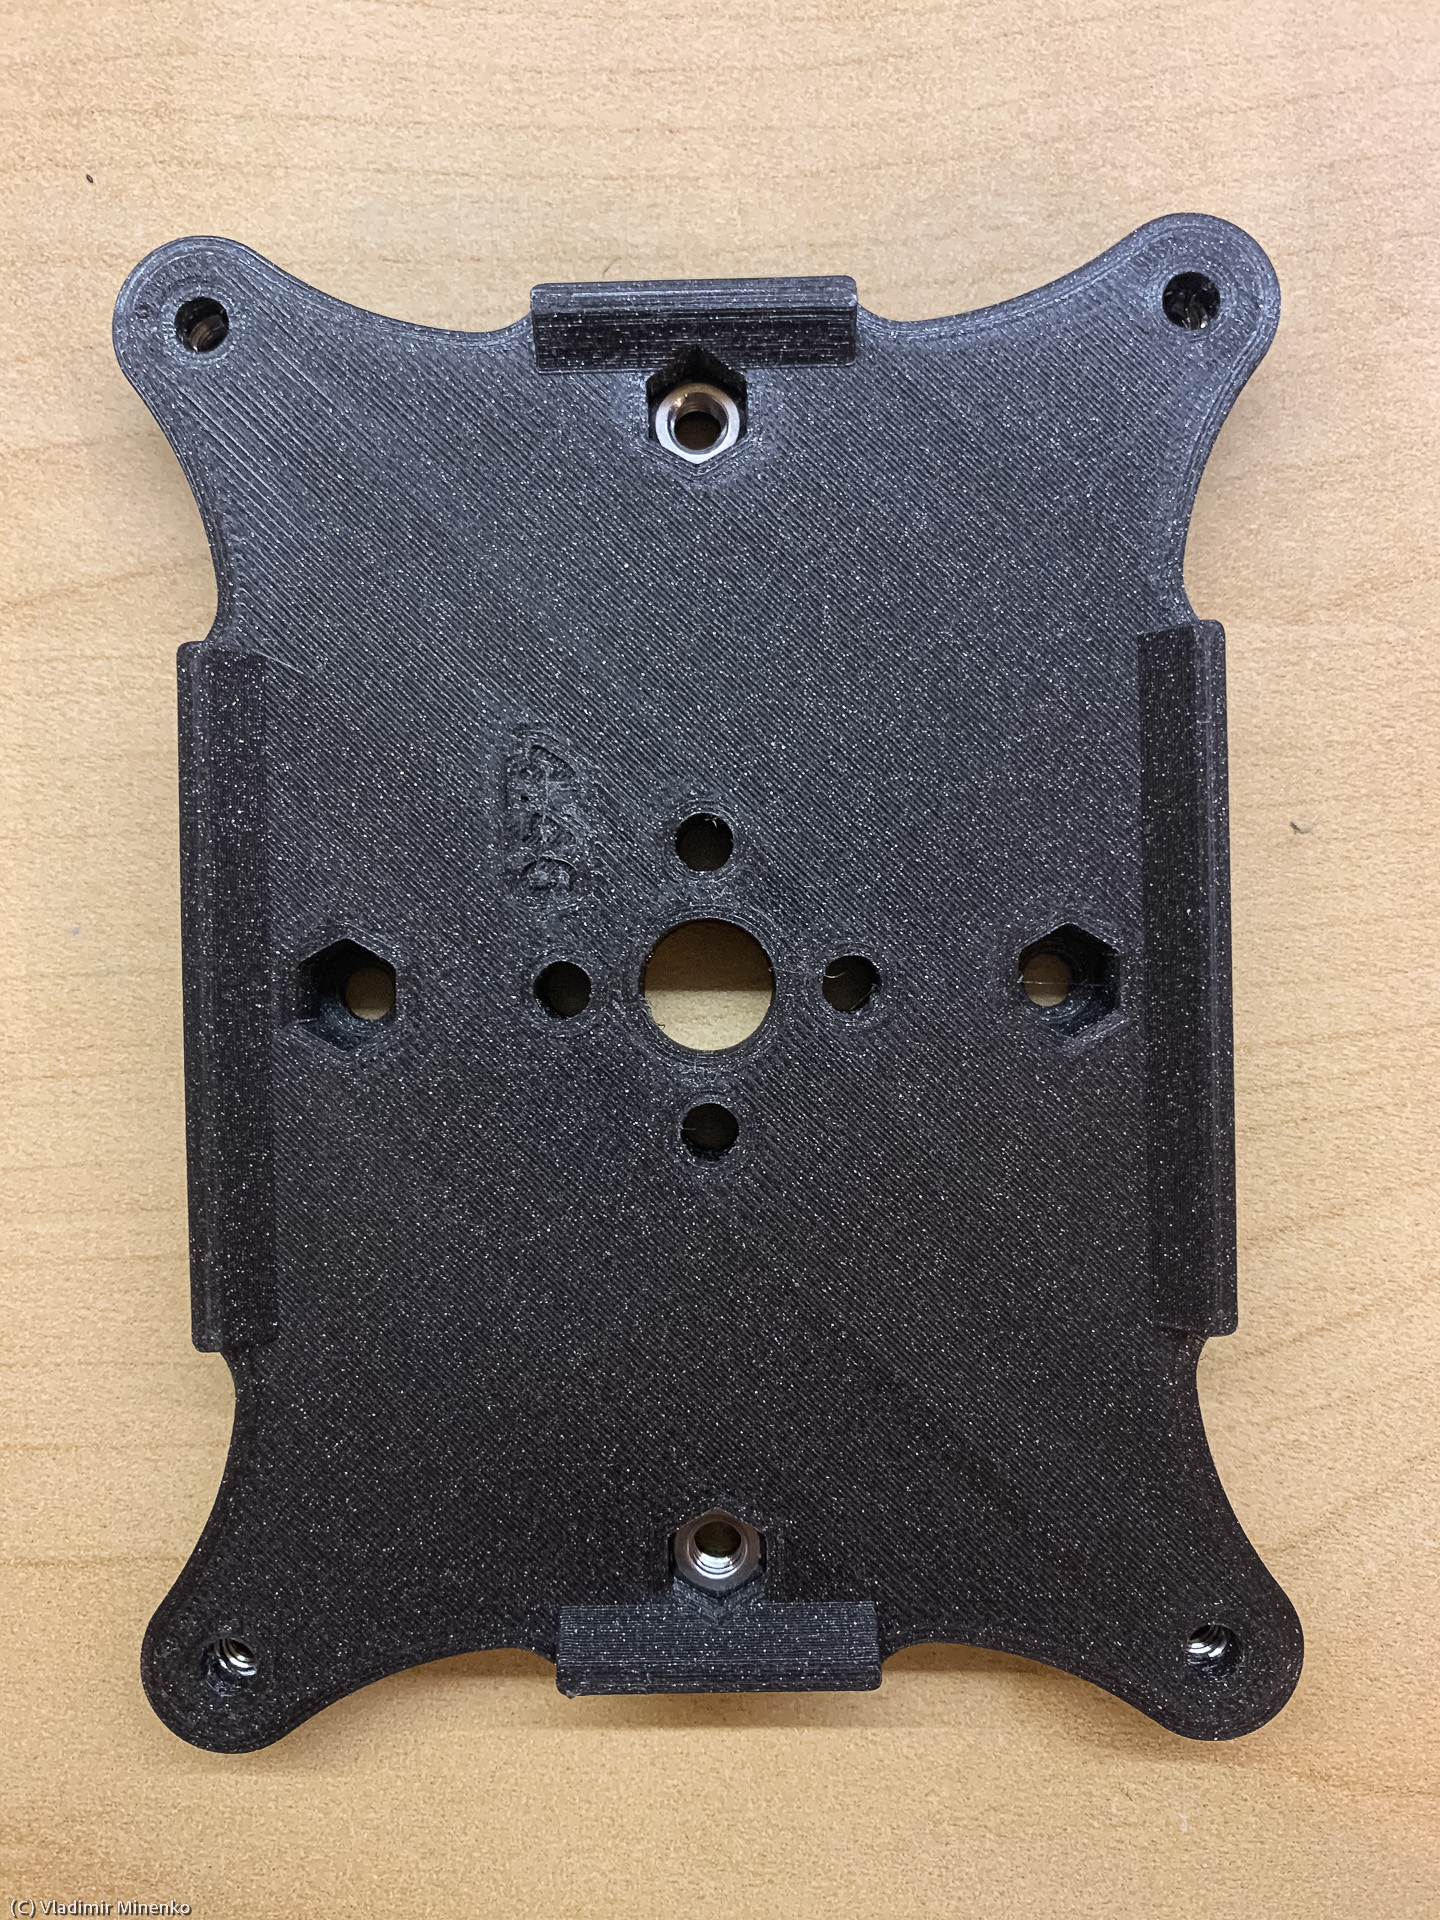
These two nuts are used for the arca-swiss plate. This plate can be mounted in two positions. Select one you need. You can certainly change this later. - Mount the arca-swiss plate. Use the shortest (8mm) screws in the set and make sure they do not stick out and scratch the ASIAIR Pro case


- Now, take the top plate. Place two nuts for the inside part of the Vixen-style dovetail clamp. You should do this now, since one of the related holes will be covered by the ASIAIR Pro and you will not be able to access it.
- Mount the EAF sliding carrier into the rails. Tighten the screws only so much that you still can move the carrier. The rails are sized so that they hold the nut. With this, you can untighten and tighten screws from top in order to change the position of the EAF. If you use various lens and cameras, you might need to do this often.


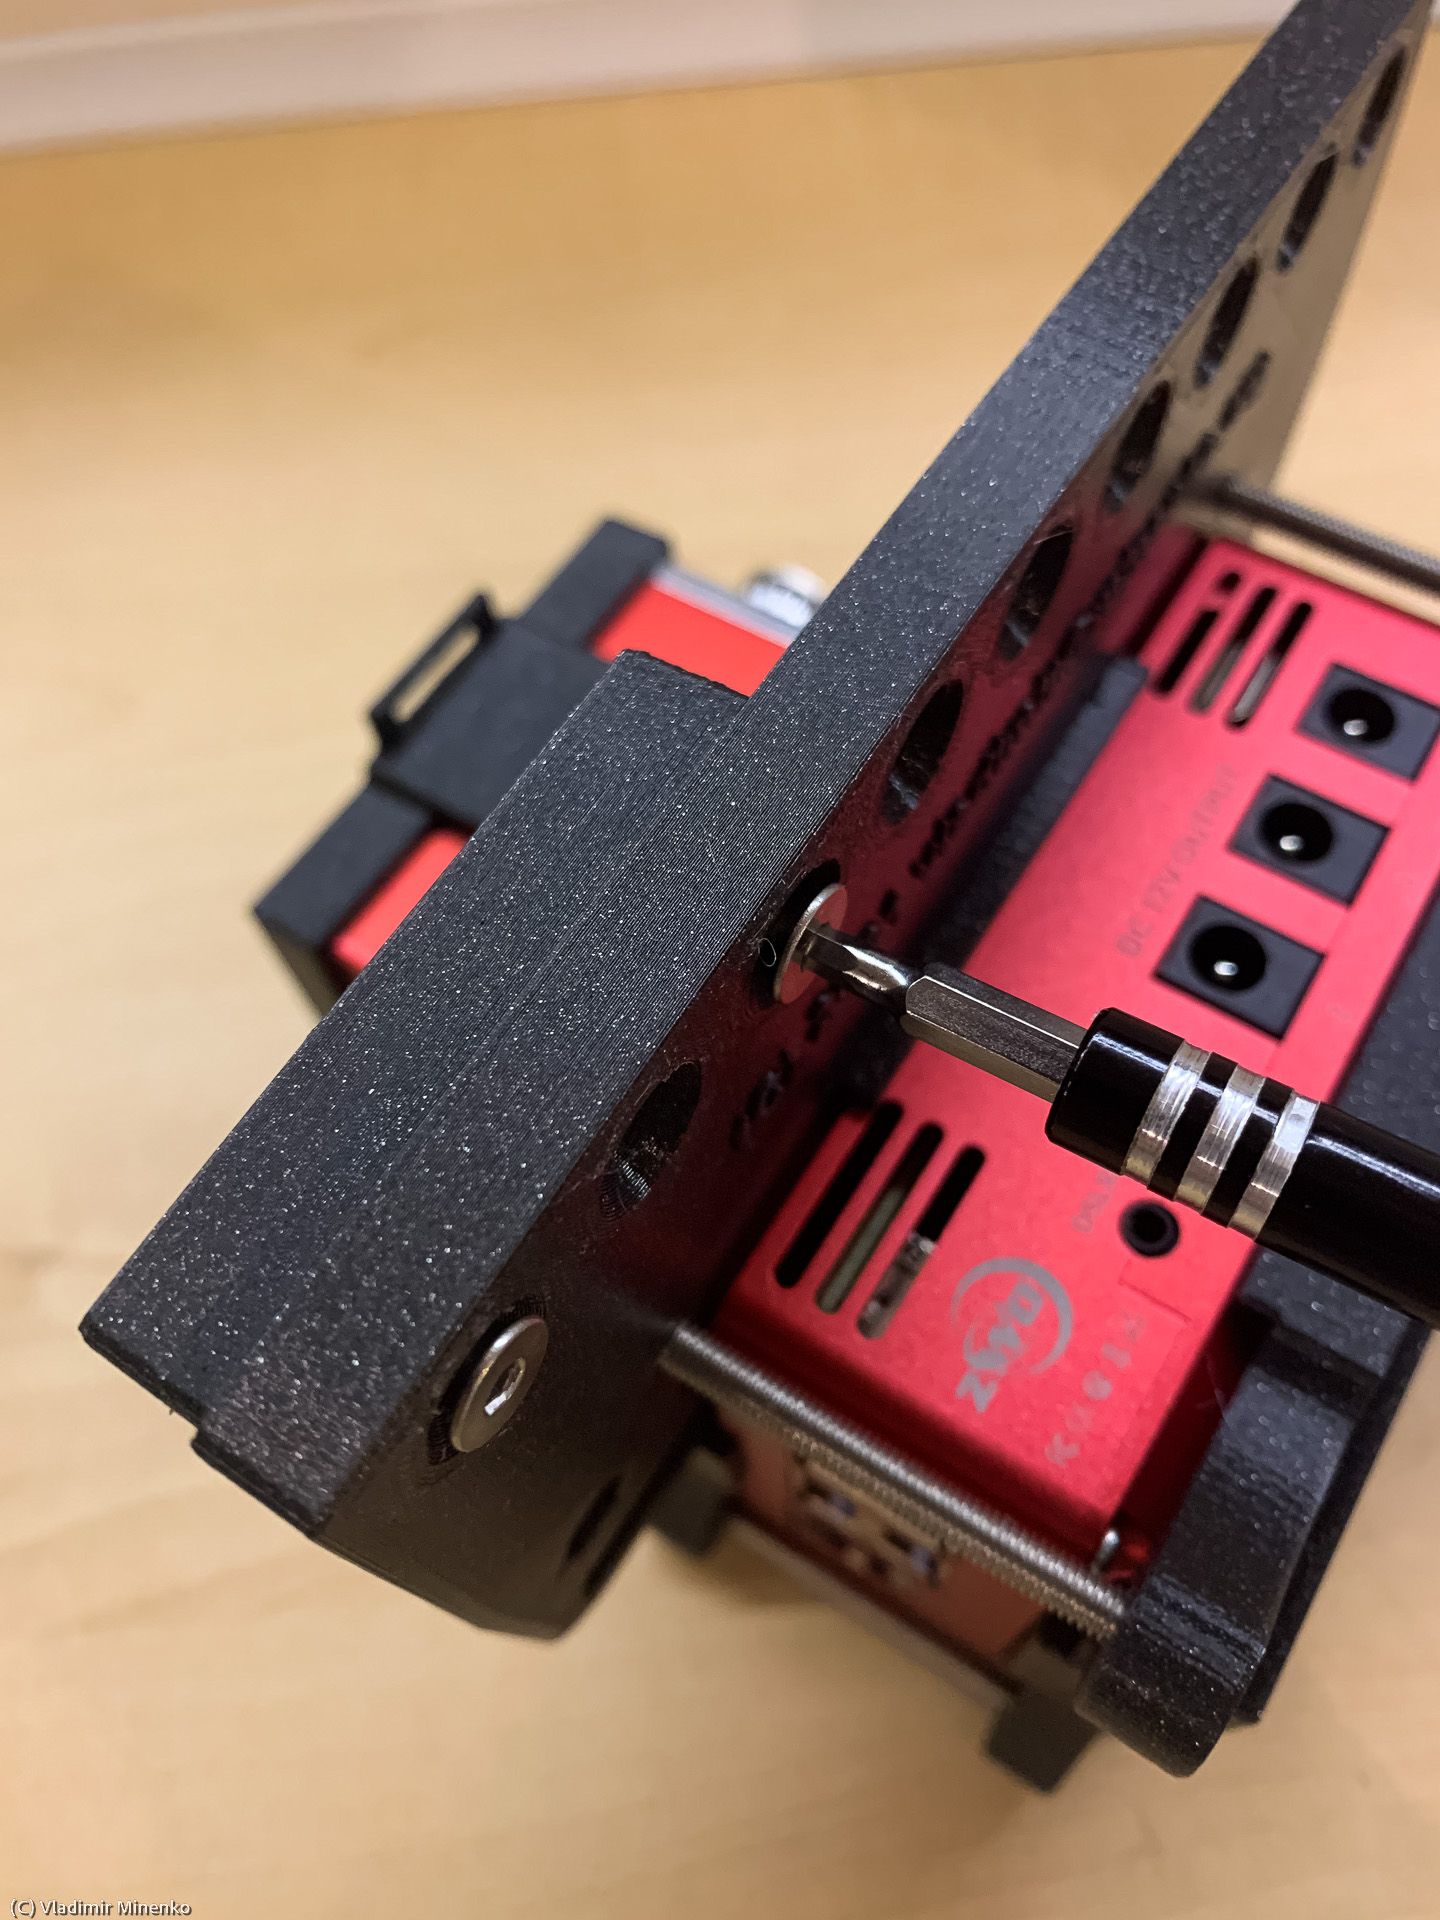
- Now we will place the ASIAIR Pro. ASIAIR Pro is fixed with 4 shorter screws on the bottom plate, placed between this plate and the top plate. All this is fixed with 4 long screws. Do not overtighten the long screws here, since this will damage plates!


- Place and fix the pulley on the axis of the EAF. Make sure that the position of the fixing screws fits the cut-off on the axis. Do not overtighten the screws!. Insert the EAF into the base fix it with screws supplied with the EAF.

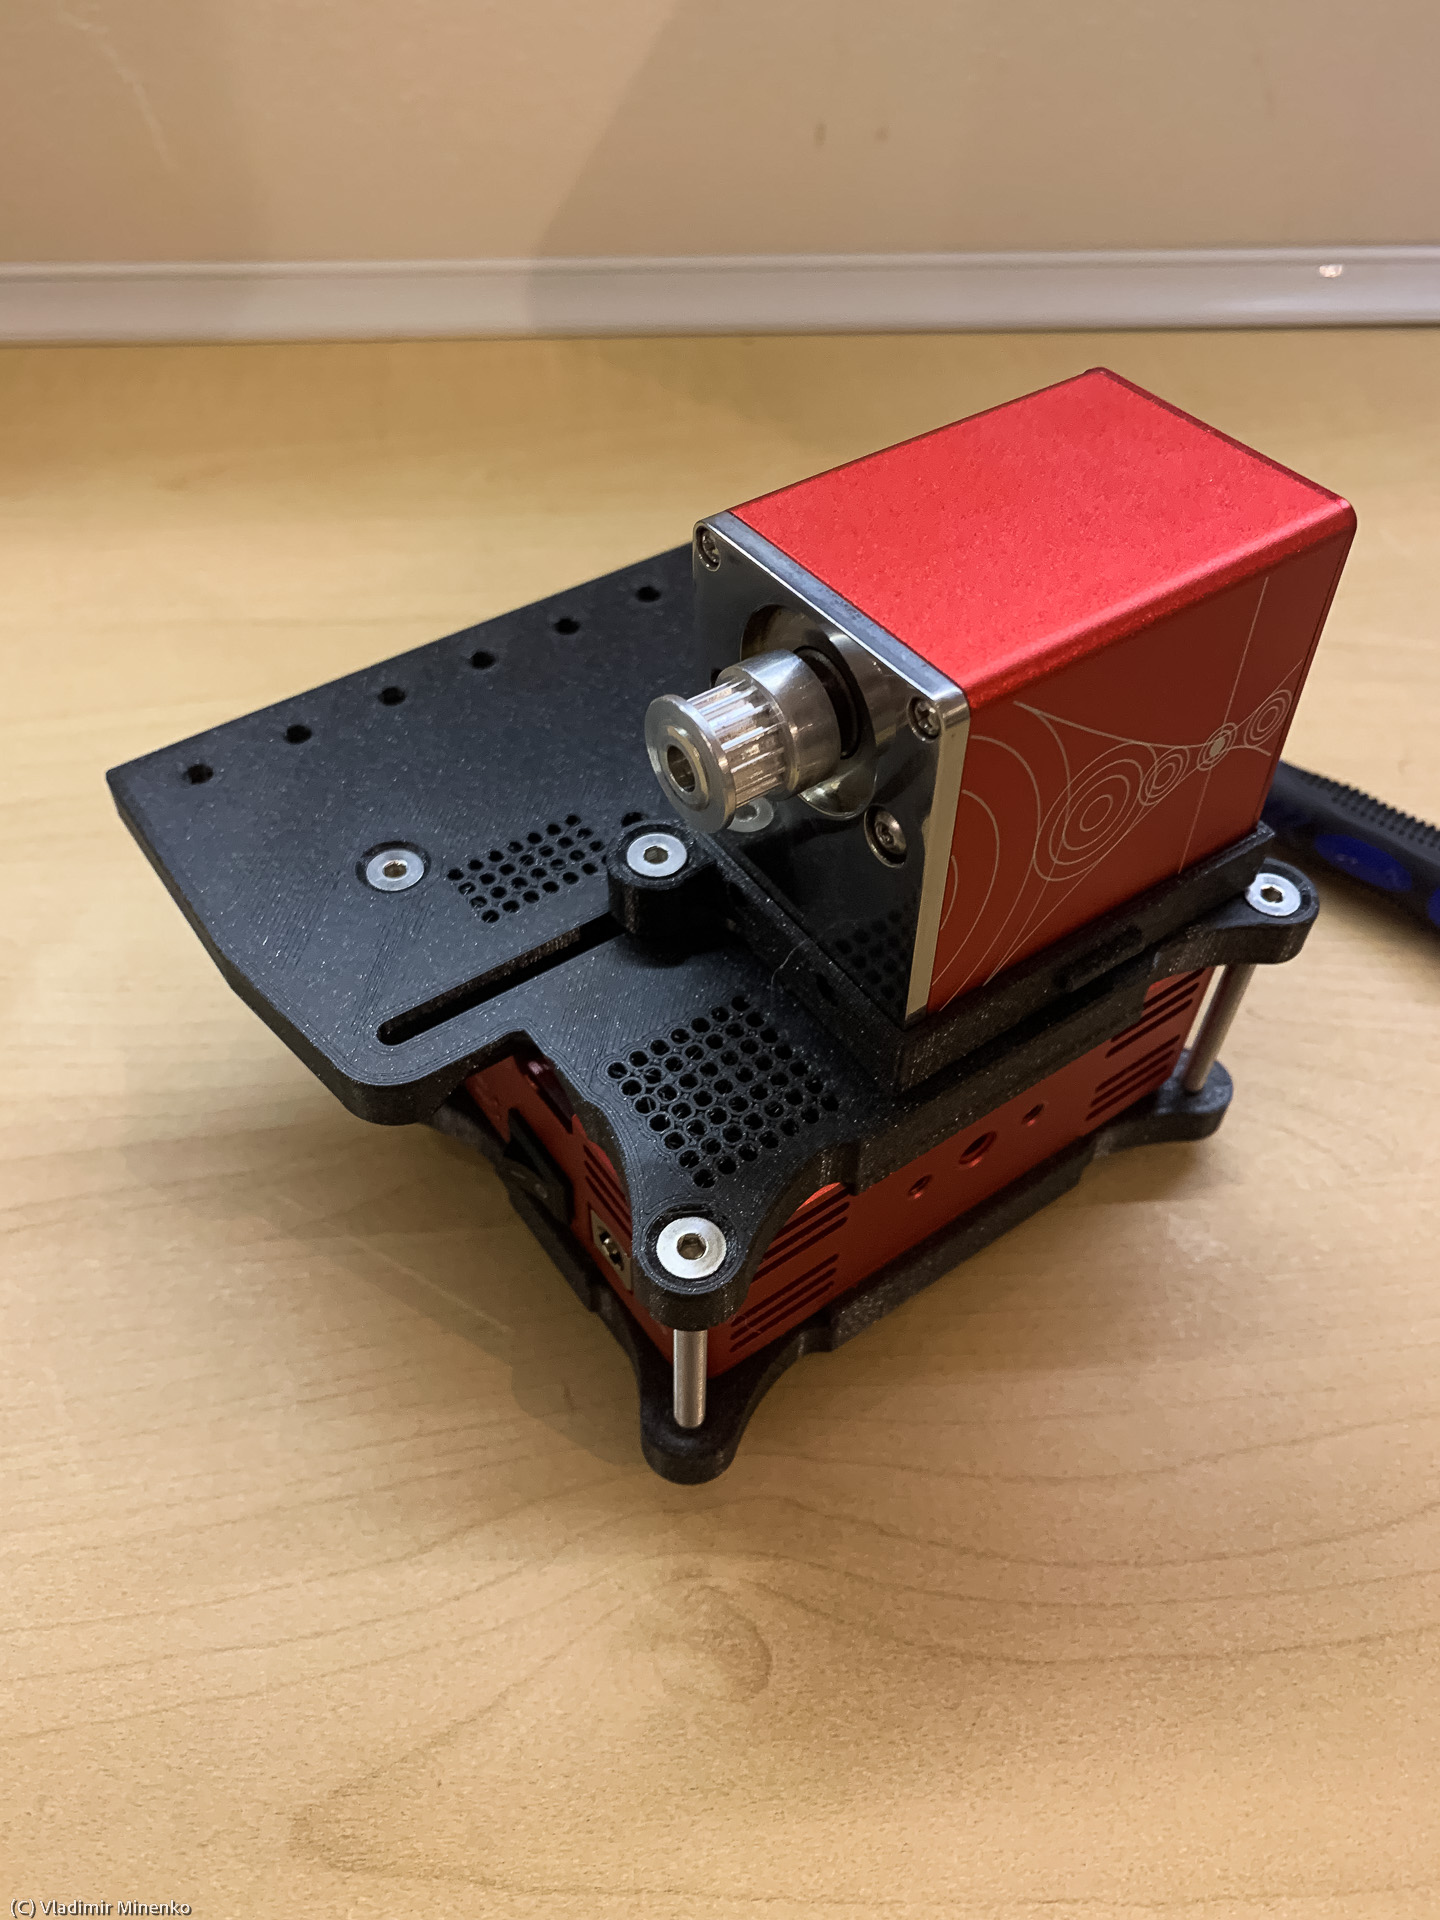
Note that the EAF can be placed facing in both directions. This allows a larger rage of positions of the EAF along the axis of the lens and so allows using very lens very different positions of the focusing ring. - Place the cover on top of the EAF and make sure the eyelets of the cover raster into the base well. The cover is more or less optional. You can omit it of you do have any use of other devices on top of the EAF, for example, a WiFi router
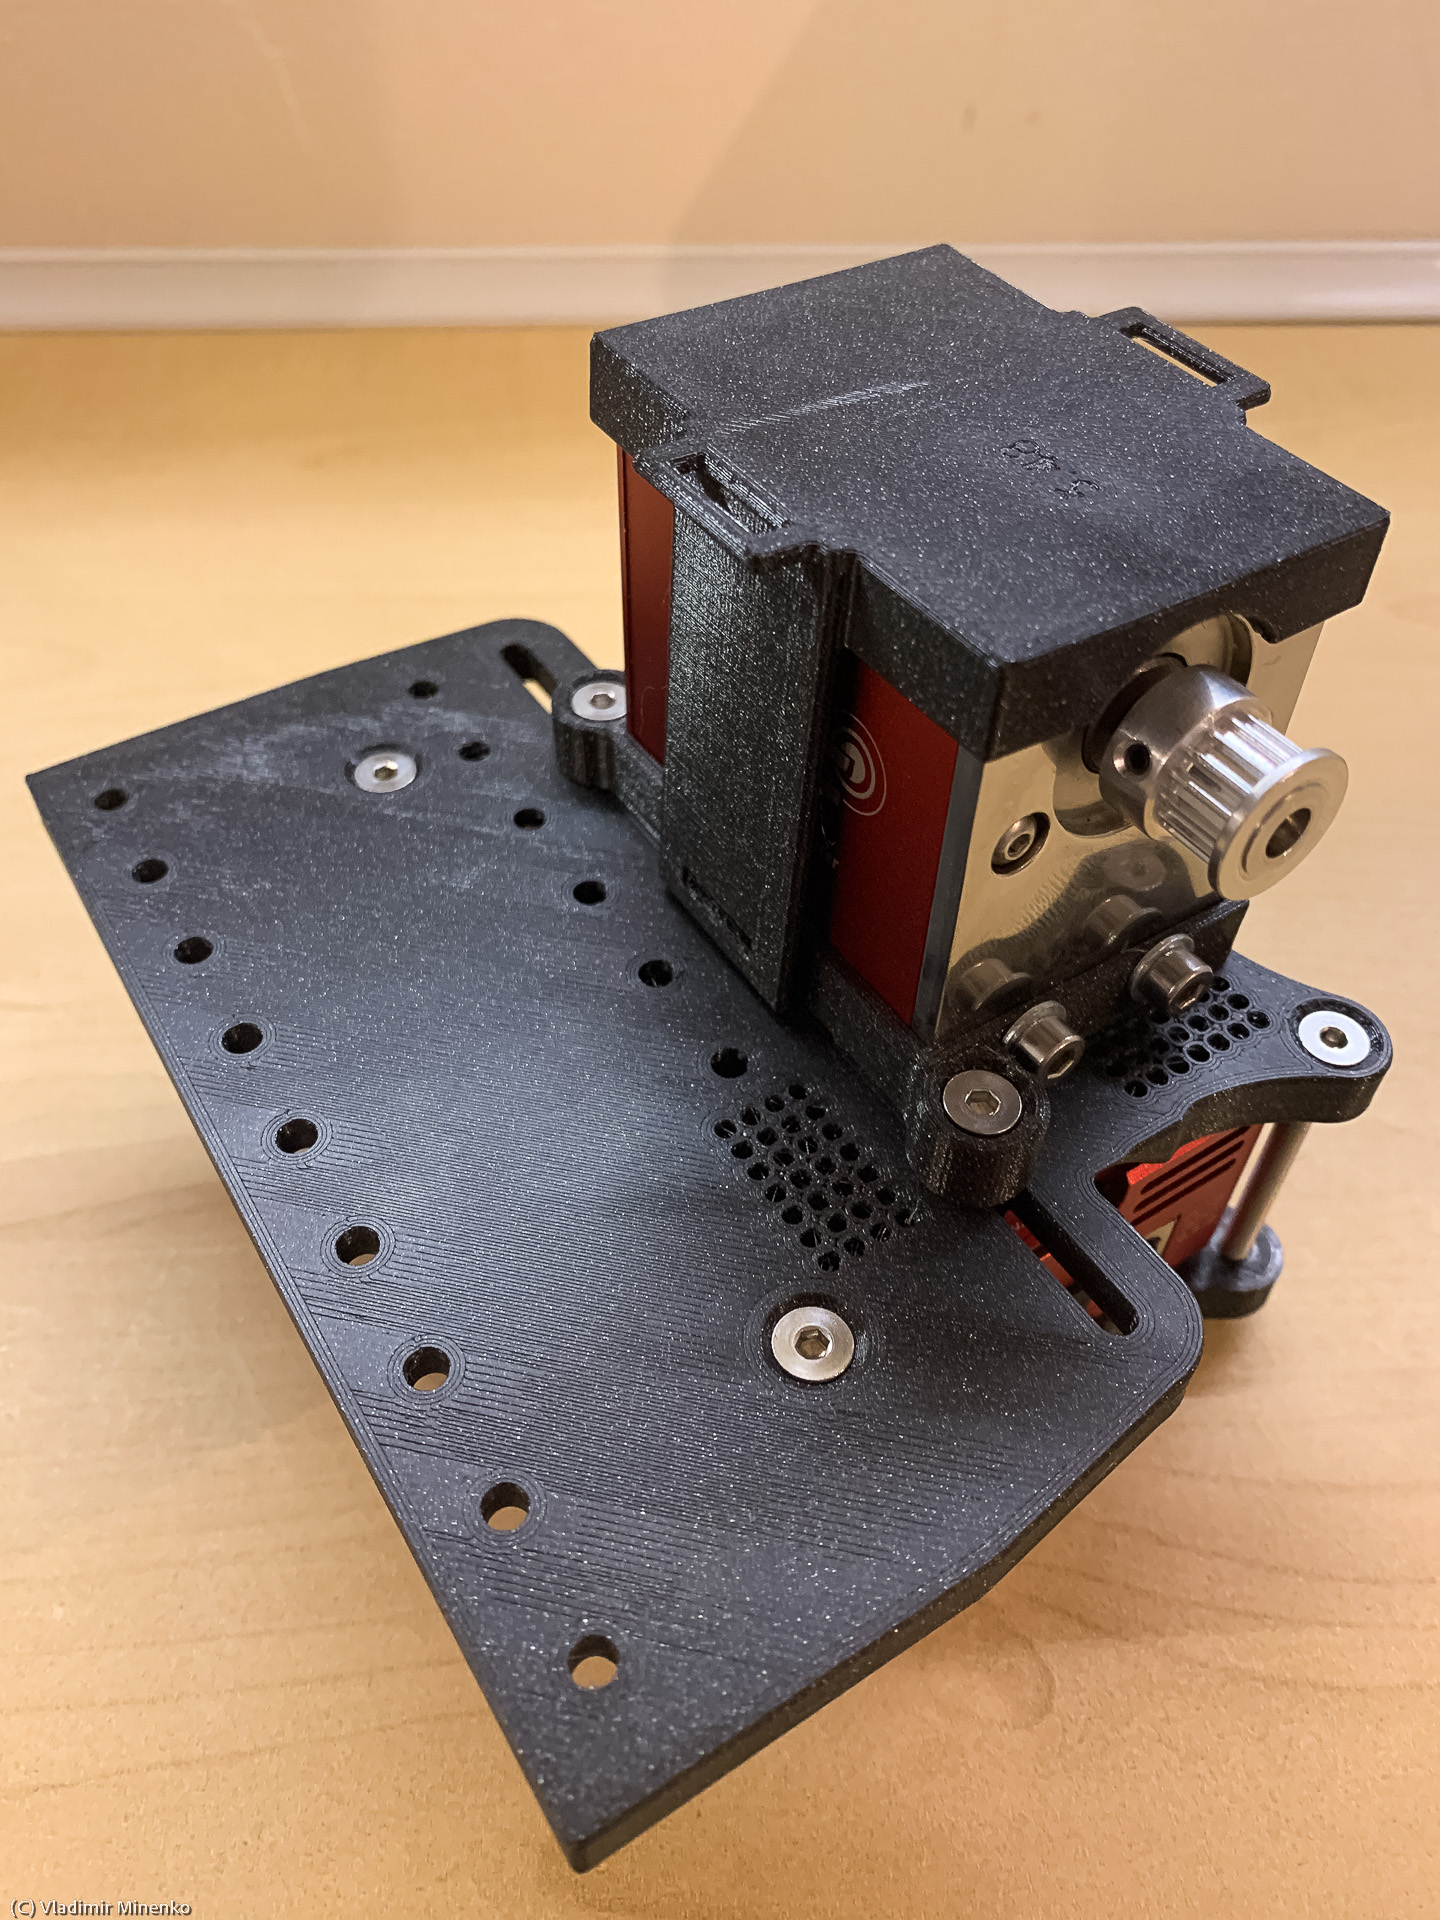

- One of the last steps is to mount the the Vixen-style dovetail clamps or the holder of a larger guide scope. Note that the Vixen-style dovetail clamps are different can be placed in different hols depending on your needs.

One of the clamps is marked with “Outside” (unfortunately, not on the picture yet) and the another one is not marked. This one is the inside one. Place nuts into the holes of the outside clamp. Like most of other nut holes they are made tight. Use one of the remaining screws to push the nut into the hole. The fixing screws are inserted from the bottom side. This allows an easy access and change of the position any time later. - If you use a larger guide scope you can place the holder on its adjustment rings. The provided holder has either M5 or M6 holes of the mounting. The according screws are not provided with the set by default, since their length and size is different with each adjustment ring set used. Most probably these are either M5 or M5 standard metric screws available in any maker shop. Most probably you will need either the 8mm or 10mm length. It is important to use flat head screws, since they need to “sink” into the holder so that it can be placed one the surface of the plate.


Like the Vixen-style dovetail clamps, the holder for a larger guide scope can be mounted on different holes according your needs. The stepping of the holes is the same. You might need to remove the outside Vixen-style dovetail clamp if you need these holes for the larger scope. The 16mm screws are used here, since some holders need to be thicker and so more solid and steady with larger guide scopes.
Note! There might be strings remaining from 3D printing here and there. The are usually not a problem and do not disturb the mounting process. Try to pull out those which do. Do not use a hot air blower to wipe them out as some people advise on Internet. One small mistake with hot air and you will damage a part of the set.

Placing the parts and adjusting the positions
A guide scope with a Vixen style foot is slid into the clams. The outside clam should be loosen before that. A larger guide scope is screwed on the top plate.

The next step is to adjust the positions to make sure that the belt hits the position of the focusing ring.
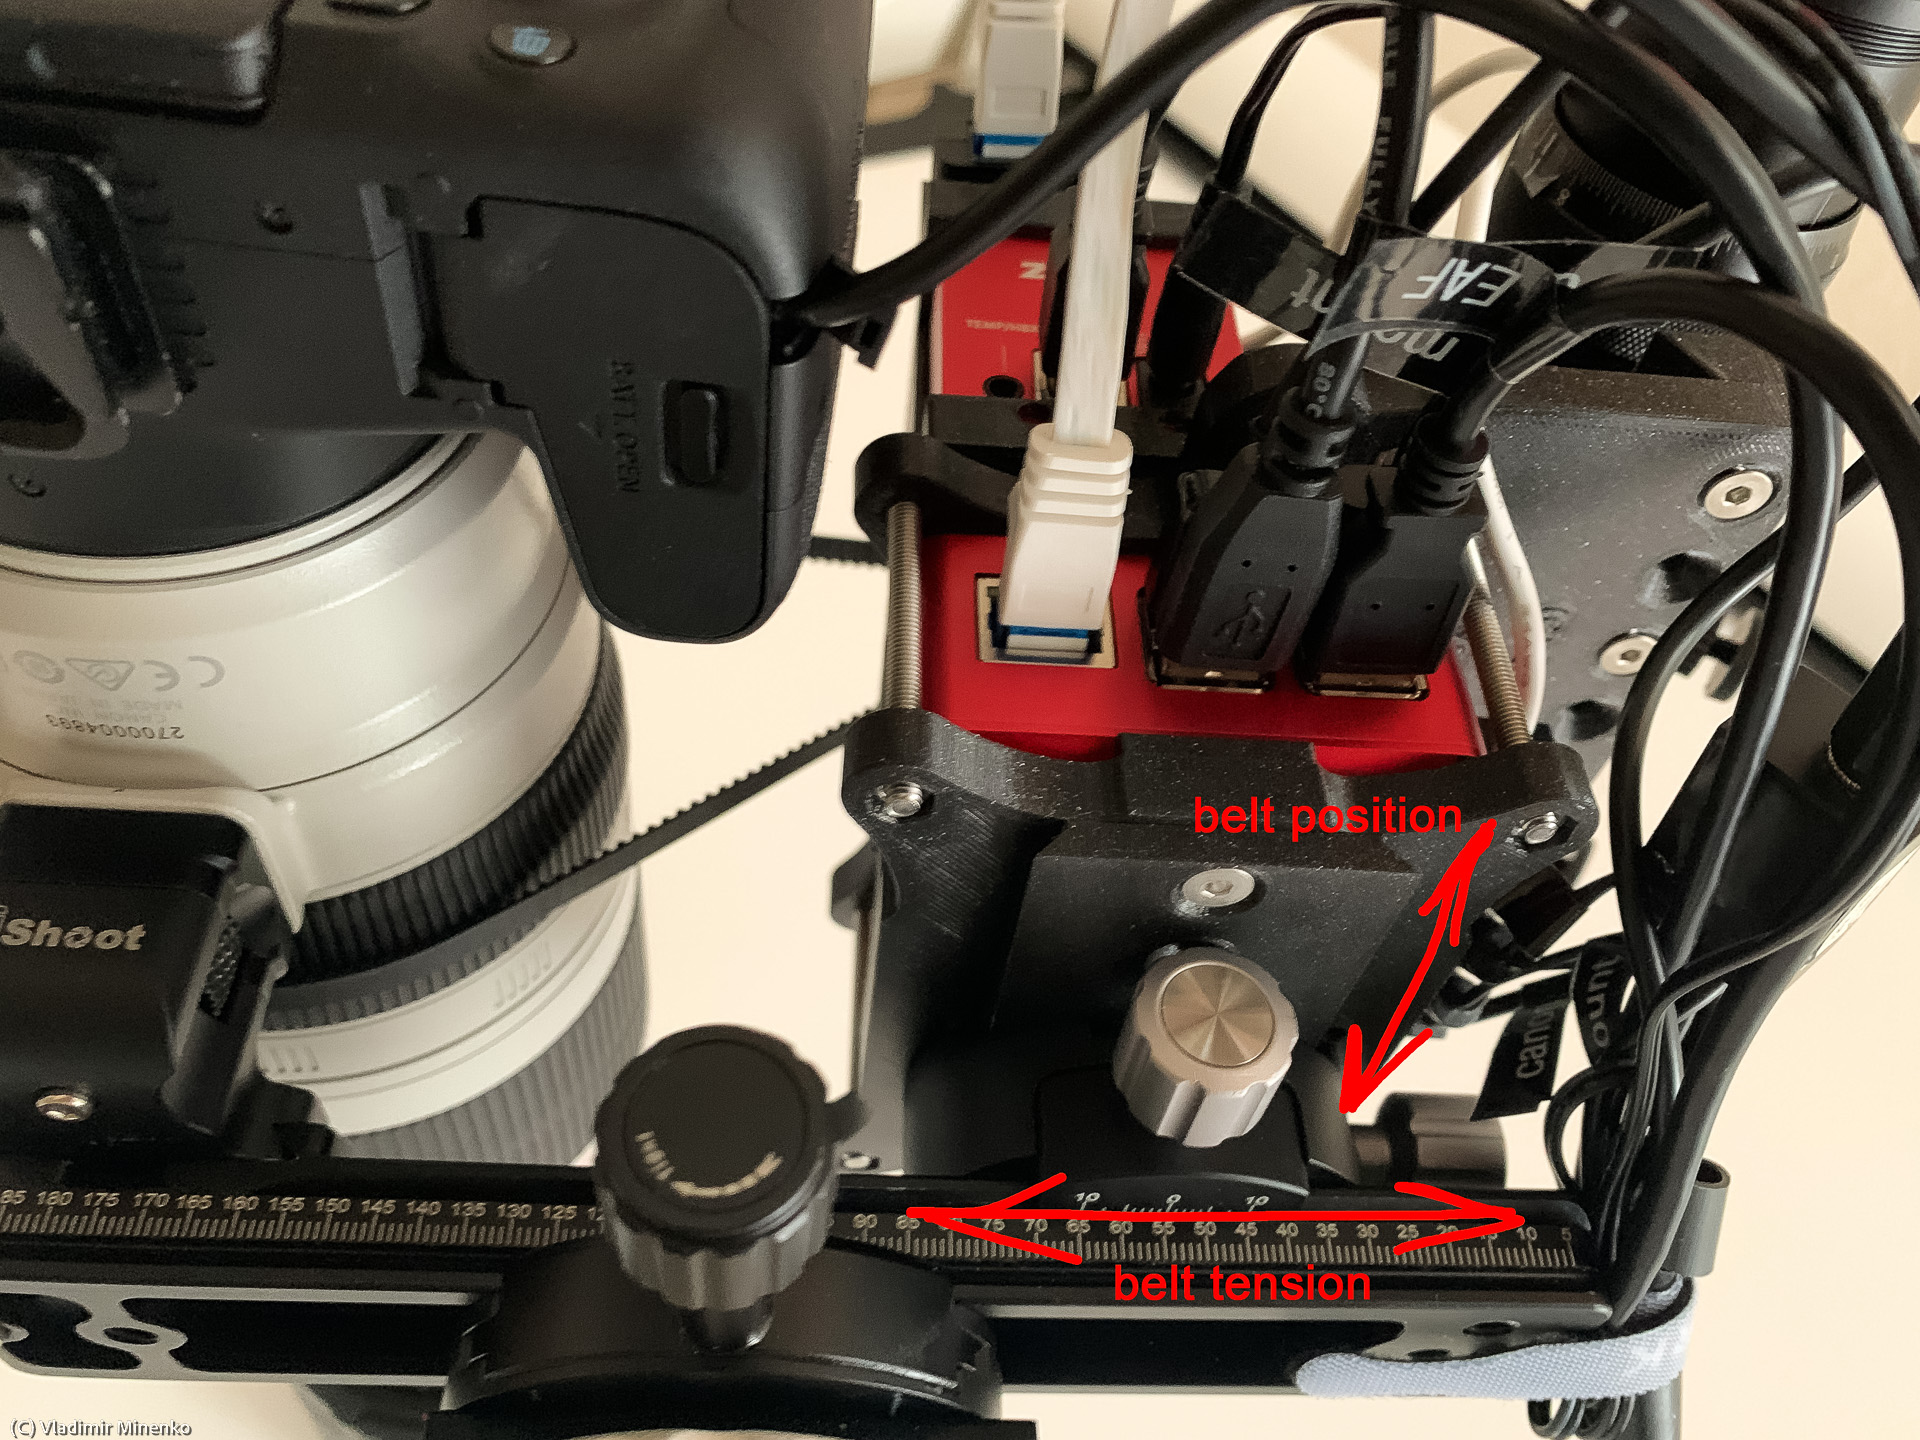
In addition to sliding the whole control unit as shown above you can also slide the EAF and even put it other way around to achieve the right position.
Use instructions
After the set is mounted and all elements of the rig are adjusted, the set does not require any additional attention. Still, here are few handy hints and tips.
Do not keep the drive belt under a tension
A few folks on the Internet mentioned that most designs of focusing systems deploying a focus ring, are sensitive to a constant pressure on the focus ring with it is applied from one side over a long time. Certainly, this kind of pressure does not occur in normal use when a user touches and slightly the focus ring from opposite sides, and does this for a short time. In order to avoid potential problems, when you are done with an astrophotography session, you should slightly move the unit towards the main camera and so take out the tension from the belt.
People who use multiple lenses and and also use them for regular photography, will probably dismount the camera anyways. In this case the belt can be kept out of tension in a “natural” way.
Fix cable around the new control unit

It makes sense to spend some time and a bit money to get shorter cables with plugs oriented in the right direction. Arrange and fix cables around the new control unit. This would allow to take it off the rig and pack away in one piece which is handy and saves a lot of time.
Find the right position and orientation for the EAF
The EAF can be mounted in both directions. This expands the range of the sliding carriage. If use changes lenses frequently, rotating the EAF on each change might become annoying. In many cases, there is range of positions of the arca-swiss style dovetail plate in its clamp and the positions of the EAF in the sliding carriage. There might be a combination which would cover the whole range of lenses or telescopes you use.
Useful dimensions references
If you need to remake some parts, especially the holders for guide scopes, you can use these dimensions:
- Mounting holes in the top plate have 15mm stepping and 4.1 mm diameter
- The screws are standard DIN 7991 stainless steel flat head M4 screws
- The nuts are DIN 934 stainless steel nuts
Change log
Version 7.x
- Simplified ventilation slots
Version 6.x
- Improved access to the microSD card slot
- Tuned the fixing bars around ASIAIR Pro casing for better fitting
- Three more holders for larger guide scopes
- A more tighten Vixen-style clams to enable holding of more guide scope using this mounting
- An EAF cover with a holder for the GL-GL-ARM300M-ext WiFi router
Version 5.x
- Added a holder for TS-Optics 60mm / 240mm guiding scope
- Added two more holes for an alternative mounting along the main rail plate.
- Improved access to the microSD card slot
- Improved clearance of fixture bars on the bottom side of the ASIAIR Pro
Hi,
This idea of yours is an absolute breakthrough in astrophotography with DSLR telephoto lenses I have a manual micro focus system but an upgrade such as this would make everything easier – just wandering, would it work with a Nikon D750 with a tamron 70-200 G2?
Thanks
Hi,
Thank you for the positive feedback! Generally, almost any lens and camera should work, since you can adjust the distance from the block with the kit to the camera with the lens by moving it along the arca-swiss rail as mentioned in the blog post. With this, you can also tune the tension of the belt. I currently ship the kits with either GT2 or T2.5 belts profiles which are widely used and available in many shops on Internet. I do not own a Tamron lens and I cannot test which belt profile fits best, but I would expect, one of the mentioned belt profiles those would fit. Generally, by experience, you do not need a 100% fit of the belt with the rills on the focus ring, neither you need a strong tension of the belt. It should be only enough to rotate the focus ring which does not require any significant force. Even in the case, the belt would not fit, you can try some others. The axis of EAF has the diameter of 5mm. This is a popular size of belts and pulleys. So you basically find another good belt profile, get a belt in the size of 400-440mm and a pulley with the 5mm mounting hole, and try how well that fits. These parts are also inexpensive. A pulley and a belt cost around 10-20 Euro/$ in total.
Received your universal EAF, asiair pro, guide scope mount . It was a straightforward setup just just little tweaks for my Nikon 300mm f/2.8, Rokinon 135mm f/2, Nikon 80-400mm f/4.5-5.6 lenses. It’s a good thing I’ve different lengths belts: 380mm -420mm .
Great idea by the way of sliding the unit in/out to tighten the belt and sliding system or the EAF.
Thank you
Hello, instead of mounting a SVBony 165 on mounting platform for eaf and asair pro and belt system, Can you replace it with asiair 180mm f/4.5 refractor??
The platform was for a side by side set up, but I need to know if 40mm diameter askar 180mm f4.5 is too wide for it . Considering the platform was supposed to fit a 50mm guide scope. The askar has a dovetail foot so it fit .
Thanks for the feedback! This might be possible since Askar 180 mm f/4,5 APO is provided with a universal finderscope bracket. I think I can source the Askar 180 mm f/4,5 APO for testing some time soon and let you know then