Road Notes While Getting into Astrophotography
Notes about most important "gotchas"Which Path to Go and Why
Page Contents
I own the Star-Watcher Adventurer Mini since 2017. Again and again, I thought of upgrading it, and then decided to keep it while creating a Go-To setup. In parallel, I wanted to enhance the Star-Watcher Adventurer Mini with an automated or computerized polar alignment. The polar alignment process via a small polar finder scope with a bad illumination was always so annoying for me that I did not use the star tracker as much as I saw great landscapes under the starry sky. See the page about different polar alignment solutions for some other details.
A Go-To capability was another big thing on my wishlist. A star tracker is good for nightscapes. You can use some landmarks to point the camera in the right direction. Still, searching a particular area of the sky and framing it was not my thing. It tried it a few times. It worked, but it is not fun at all, whereas, I heard, some people enjoy this process. Why not… The GoTo functionality requires a motorized equatorial mount. It can move in any direction and point the camera at specified coordinates. On top, the Star-Watcher Adventurer Mini cannot not hold and move a large camera with a long focal length lens steady and precise enough. A real equatorial mount with guiding seemed to be needed.
When using a mount, I wanted to avoid using a notebook in field and rather make my new setup highly portable and lightweight so that it can be taken anywhere. This is like in daytime photography: the best camera is the one you have with you at a given moment. I believe, this apples to astrophotography as well: “the best equipment is the one you use most often”.
As a photographer, I wanted to extend my daylight photography equipment and avoid buying proprietary astrophotography gear whenever possible. This page is a collexction of notes form the major “gotcha” milestones on this way. See page about my current astrophotography equipment setup for more details which gear I ended up with.
Lightweight Equatorial GoTo Mount Choices
There is only a small number of lightweight computerized GoTo mounts on the market:
- Sky-Watcher EQM-35, realistic payload for astrophotography ~7kg, total weight ~17kg
- Explore Scientific iEXOS-100 PMC-8, realistic payload for astrophotography ~5kg, total weight ~6kg
- iOptron SmartEQ Pro+, realistic payload for astrophotography ~4kg, total weight ~6kg
- And, well, the Sky-Watcher AZ GTI, which I own. See below.
While reading forum posts and other sources on the Internet about the control software, I stared spotting the Sky-Watcher AZ GTI mount being mentioned often and used in equatorial mode, even though it is sold as an azimuthal mount. It also turned out that there is a special version of firmware for Sky-Watcher AZ-GTI with which it can be set into the equatorial mode. It could be used with the polar wedge and with the counterweights from the Star-Watcher Adventurer Mini. Sky-Watcher AZ GTI is very small and weights only 4.5kg. Still, it can carry ~3kg astrophotography payload. I got Sky-Watcher AZ-GTI and started to see how I can set it up.
A Word About Cameras
The focus of my blog is astrophotography for daylight photographers. So I assume you already have a mirror-less or a DSLR camera. The one you currently have should be the one you start with. Even if you will discover better choices, try to keep using you cameras as long as possible. Even though a dedicated astrophotography camera has many advantages, as a daylight photographer you are still ahead people starting from scratch. Those people have to buy a camera, but you already have one which can be used. Below are different aspects which I learned for myself and believe they might be useful for your considerations.
Camera Makers and SDK and Integration
Historically, Canon was very early to release an SDK for their cameras. Nikon did this over time as well. Due to this, there is a very large range of photography, incl. astrophotography, software supporting Canon and Nikon cameras. In addition to the SDK, other technical information supported creation of companion products for Canon and Nikon cameras: lens mounting adapters, power adapters, remote triggers, etc., etc. Other makers, such as Sony, Fuji, or Olympus have products which are sometimes superior to their competitors from Canon and Nikon. Unfortunately, these product are too hard to integrate and can be used in astrophotography only with many limitations.
Some long time ago, it happened to me to buy a Canon analogue DSLR. I kept with Canon since then. I’m a kind of lucky about this in terms of compatibility.
Camera Modifications
Any daylight camera has to have various filters in the front of its sensor. These filters are used to make sure that the camera processes the spectrum of light which the human eye is most sensitive for and the data from the sensor reflects the way how humans eye work. Unfortunately, the filtered part of the spectrum is exactly the one which is widely spread in the starry sky. The largest part of it is deep red through infrared (IR) light. It is possible to remove those filters and improve the sensitivity of a camera in this spectrum. There are to levels of modifications. On the first level, a modified camera can still be used in the daylight, but needs am OWB (Original White Balance) filter. And yeah, a custom White Balance is not enough. The second level is often called “full spectrum modification”. It makes the camera being very sensitive to the IR light. Such a camera cannot be used for daylight photography anymore. See this article on “Sky and Telescope” for more details.
Astro-modification of a camera makes sense. It brings up considerably more red lights in most Deep Sky objects. Some advice if you decide doing a modification:
- If you have an older Canon or Nikon DSLR as a second camera which you rarely use, modify this one. Despite that fact that this is a good budget choice, in many cases, some older APS-C camera make better astrophotography pictures than cutting-edge DSLRs
- If you have a choice, select a camera with a tilting display. Tilting display rocks in astrophotography!
- Unless fine mechanics and optics are your major hobbies, you better let specialists do this modification. It is generally not very complicated, but if you do this not perfectly, there will be some strange defects or effects on all your pictures which will be very hard to compensate
- Ask the folks who do modification if they can provide an OWB filter which fits the camera characteristics
- Ask the folks who do modification if they conduct quality assurance measurements after the modification
- Take a test picture before and after modification with and without the OWB filter so that you know how your camera behaves
Specialized Monochrome Astrophotography Cameras
It is disputable if a color astrophotography camera (also called “OSC” – one shot camera) is always better than a good mirror-less or DSLR camera. There are good arguments from both sides. One thing is clear though. For technical reasons, specialized monochrome astrophotography cameras have characteristics which make them absolutely unbeatable when compared even with very high-end mirror-less or DSLR cameras. The difference is very impressive! It comes with its price. A monochrome camera requires using filters. You need to make shots for each of filter. The post-processing is more complex. You also will need to buy 3-7 filters and most probably a motorized filter wheel. This gear is not cheep.
My strong advice is to put such a camera on your long-term wish list. Start using your mirror-less or DSLR cameras first. You can upgrade later. You still will need your mirror-less or DSLR cameras for nightscapes and panoramas.
Using a Laserpointer? Maybe, Better Not…
Interestingly, one of the challenges in astrophotography is to find out where exactly the camera is look into. This starts pretty early in the process of setting things up. Even with a star tracker you need to direct the RA axis onto the Polaris star (in the Northern hemisphere).
Using a laserpointer which is aligned with the axis of the lens or with the RA axis is a good, but a dangerous and risky idea. I did a few tests of various laserpointers and found out that you need quite high output power to be able to see the light trace in the sky. That much power might even be illegal in your country. And in any case, you need to be very careful and never get the beam or its reflection into your and others’ eyes! Proceed with large caution!
Clams and Rails: It Is a Mess of De-facto Standards
When making your own gear setup, you are going to mechanically connect several parts. While regular photography meanwhile managed to unify on so called “Arca Swiss” dovetail mounting, astrophotography brings in at least three other dovetail-based, but incompatible mounting systems. I managed to unify on the 38mm arca-swiss starting from the mount. This might or might not work well for you, depending on how much more astrophotography specific hardware will be used. Here is a summary of some key facts and interesting references about this.
Arca-Swiss
An ultimate in-depth overview of this “quasi-standard” is available on this page (in German). It is a “quasi” standard, since the only concrete specification details is the 38mm (1.5″, inch) width of the dovetail plate and the 45 degrees of its sides. There are many deviations implemented by various brands and still available on the market. The largest and the most critical deviation comes from the fact that 1.5″ is 38.1mm and not 38mm. This tiny difference is crucial: if a 1.5 inch clamp is 0.1mm too wide for a 38mm plate, it does not hold. Meanwhile, this problem is very rare. Still, I observed it with the Shoot lens collar foot IS-THC140 for my most used lens – Canon EF 100-400mm f/ 4.5-5.6L IS II USM. The IS-THC140 is even slightly narrower than 38mm and can be used only with a few clams. The strong advantage of IS-THC140 are the integrated rails on the sides which allow fitting it directly into a clam and so avoid a possible twist: the lens is heavy…
The unbeatable fact is that a very large variety of accessories is based on the Arca Swiss profile. Large photography brands and manufactures started to adopt this profile more and more.
Dovetail Mounting in Astrophotography
As listed on this page (in German as well), there are not less than eight (!!!) styles for dovetail mounting in astrophotography. Only the systems from Losmandy and Celestron seem to fit together. The type of mounting is rarely specified on a product page. In most cases it is safe to assume it is Losmandy or Vixen GP. The only astrophotography dovetail mounting I currently use is the plate attached the Vixen-style clamp on the mount. It holds a robust arca-swiss style clamp fixed by two M6 screws.
Despite of the standardization mess, there is a reason for more massive dovetail systems.. All mounting elements in astrophotography are designed to hold very large and heavy equipment as steady as possible. “Large” is 1m telescope tubes and equipment weighting 10kg and more in total. These dimensions are not known in regular photography and were not needed when the arca-swiss style mounting was designed.
If looking through the shops, it seems that there two most used dovetail mounting systems. Vixen GP as a “smaller” one used for lighter and small parts. The Losmandy mounting used for large and heavy gear.
Mounting Heavy and Long Lenses
A small detail once resulted in strange problems with guiding. It turned out that the camera was slightly rotating around its standard 1/4″ mounting hole. Just a bit, but almost continuously… Lessons learned: when using long and heavy lenses the camera has to be mounted on the lens’s collar and not on its mounting hole. Many super telephoto lenses are shipped with an original collar. For some lens, you have to buy one from a 3rd party.
If you buy or use a lens collar, make sure it has buit-in arca swiss mount rails. The standard way of mounting via an 3/8″ screw does not work well. Large and heavy setups still slide slightly when mounted on a screw. You will not notice this in regular photography, but guiding will notice this and not like it! 🙂
Mounting Screw and Camera Threads In Astrophotography
The world of regular photography knows the lens mounting systems which are mostly proprietary for a given camera manufacturer, despite of Micro Four Thirds. Then there are metric threads used for filters, and the 3/8″ and 1/4″ threads for mounting of accessories.
Astrophotography uses a larger variety of different threads. IMHO, this variety resulted from the times when people tried to attach off-stock cameras to custom made optics and telescopes. Some more threads came later from microscopy and surveillance equipment. The largest problem is that there are barely ant standard names for threads, despite of the T2 and various M-threads. Many makers do not specify which mounting thread they actually use.
The most common types of threads are the T2, the CS thread, and the 1.25″ mounting hole and thread. 1.25″ mounting comes from the microscope domain and is mostly used for eyepieces in astronomic observations. Many compact guiding cameras, for example, ZWO AIS290MM Mini have a casing in the 1.25″ format so that they can be just inserted in an 1.25″ eyepiece mounting slot. Well, I would not do this, BTW, because, the camera wobbles so much so you probably will never get guiding working well. Many other cameras, also including ZWO AIS290MM Mini, have a “CS” thread in the front in addition. In many cases you need an adapter, for example, from the CS thread on the camera to T2 on the guide scope. Many adapters play a role of a spacer in addition, for example from the camera’s sensor to the focus plane of a focuser on the telescope.
Agena Astro has a very good and detailed article about this: Astronomy Threads Explained.
When you buy components, you always should check if and how they fit together. It is not given in most cases in astrophotography gear that you can attach one part to another using “common sense” or because threads or holes looks so similar. Fortunately, there is a large choice of adapters for almost any need. You first need to find or guess the keywords or a name to be used for searching… Measuring does not help much in many cases. Talking to the seller is the best.
The Guiding Camera, a Scope and the Control Interface
Starting with the 200mm focal length and exposures longer than 2 minutes, the precision of tracking should be very hight to achieve acceptable results. You can achieve it either with a very good mount (starting at 2500 Euro) and with hours spent for a perfect polar alignment. I realized this in my first picture made on 400mm with exposure time of 120sec. All stars were elongated. I first thought, my new AZ GTI stopped tracking. What is the interface for guiding? In the mid-1980s, SBIG (Santa Barbara Instrument Group, USA) started offering the first “budget” autoguding solution called “ST-4”. ST-4 used a DB15 connector, but the first retail mounts supporting ST-4 had a RJ12 connectors. An adapter cable was provided. In addtion to other mount controls, the ST-4 device sent correction command to the mount via this line. See this page for more historical and technical details. The original ST-4 device combined a camera and a control unit in one product. Most modern dedicated guiding cameras still have an ST-4 connector, but require a computer or a dedicated device which calculates correction commands based on images acquired by the camera. Today, images are transferred via USB, and a computer uses the same USB connection to send correction commands to the camera which forwards them via the ST-4 to the mount. Later on, the ASCOM project introduced pulse guiding which does not need a dedicated guiding interface and uses a connection from a computer to the mount. Today, most people use se PHD2 as guiding software. It supports various related interface combinations. In short if you have an RJ12 socket marked as ST-4 on the camera and on the mount, you connect them and connect the guiding camera via USB to the computer. In PHD2 you have to select “on-camera” as “guider interface”. Some mounts use control protocols which include correction commands for guiding. This is the case for Sky-Watcher mounts controlled via EQmod. This enables guiding with the Sky-Watcher AZ GTI mount which does not have the ST-4 interface. Moreover, a direct connection via EQmod simplifies and lot of things too.
Sensitivity is the most important factor when choosing a guiding camera. The camera does not need to have a high resolution. Colors do not matter either. A sensitive black-white camera is the best choice.
A guiding camera is attached to it own, small scope. The focal length of this scope is said to be at least 1/3 of the focal length of your main scope or a lens. Exactl 1/3 ratio is not a must. You should not go extremes with focal length. It is better to select a scope with a larger aperture and convenient focusing mechanics.
Many people use a simple 30-50mm scope with focal length of 120-200mm. I initially started with the ZWO Mini Guide Scope (120mm, 30mm, f/4) snd the ZWO ASI120MM-S camera. It worked well a lens at 400m even though 400 / 3 is more then 120. By time I tried to improve guiding accuracy and thought a larger and better guiding scope would help. I bought one with 50mm aperture and 180mm focal length. Later on I also bought a better guiding camera: ZWO ASI290MM Mini. Ad the end, the better camera brought more improvements than the larger scope. Today, I see this as an example where more expensive and larger gear is not always better. Additionally, in my experience, the leveling of the tripod, the quality of the Polar Alignment, the seeing at a given night, precision and stability of the mechanics have a much larger influence on the guiding results than the involed gear as auch. So you better do not swap guiding and other hardware often, rather learn how to make it work better and improve mechanical stability.
There are few good resources on Internet to learn more about guiding. My highlights are two articles from Agena Astro: about selection of the guide scope and an overview of ZWO cameras including details about cameras relevant to guiding in general. Be aware that these and other pages also discuss aspects which are sometimes more related to really large astronomy setups with apertures of 250mm and focal length of 2000mm and more.
How to attach your new guide scope? Proceed pragmatically in the beginning. The guiding scope has to be attached roughly coaxially with the main camera. A perfect precision of the direction is much less important than no flexure in mounting. A flexure in mounting will result in guiding errors which will be hard to explain. Deviations in coaxial alignment can theoretically result in some guiding problems as well, but this will not have a serious impact at the current stage. When attaching the guide scope, pay attention that the guide camera should be placed in a direction at which edges of the sensor following the RA and DEC axis, basically “vertical” and “horizontal”, and not at some random angle. This is some of not well documented aspect, but it does improve guiding performance.
ZWO ASIAIR – It Feels Like “iPhone for Astrophotography”
In astrophotography beyond nightscapes, you will need quite some additional software to support your workflow. Most people use a notebook with 2-4 dedicated software packages or some additional devices. This adds quite a pile of things to take care of, configure, run, learn how to use and resolve problems if their fail. Plus, this all costs quite a time to command on site and so distracts from what you are actually doing – photography.
Fortunately, in our times, there are some very good integrated solutions. I started with Stellarmate (based on the INDI platform) and later moved over to ZWO ASIAIR: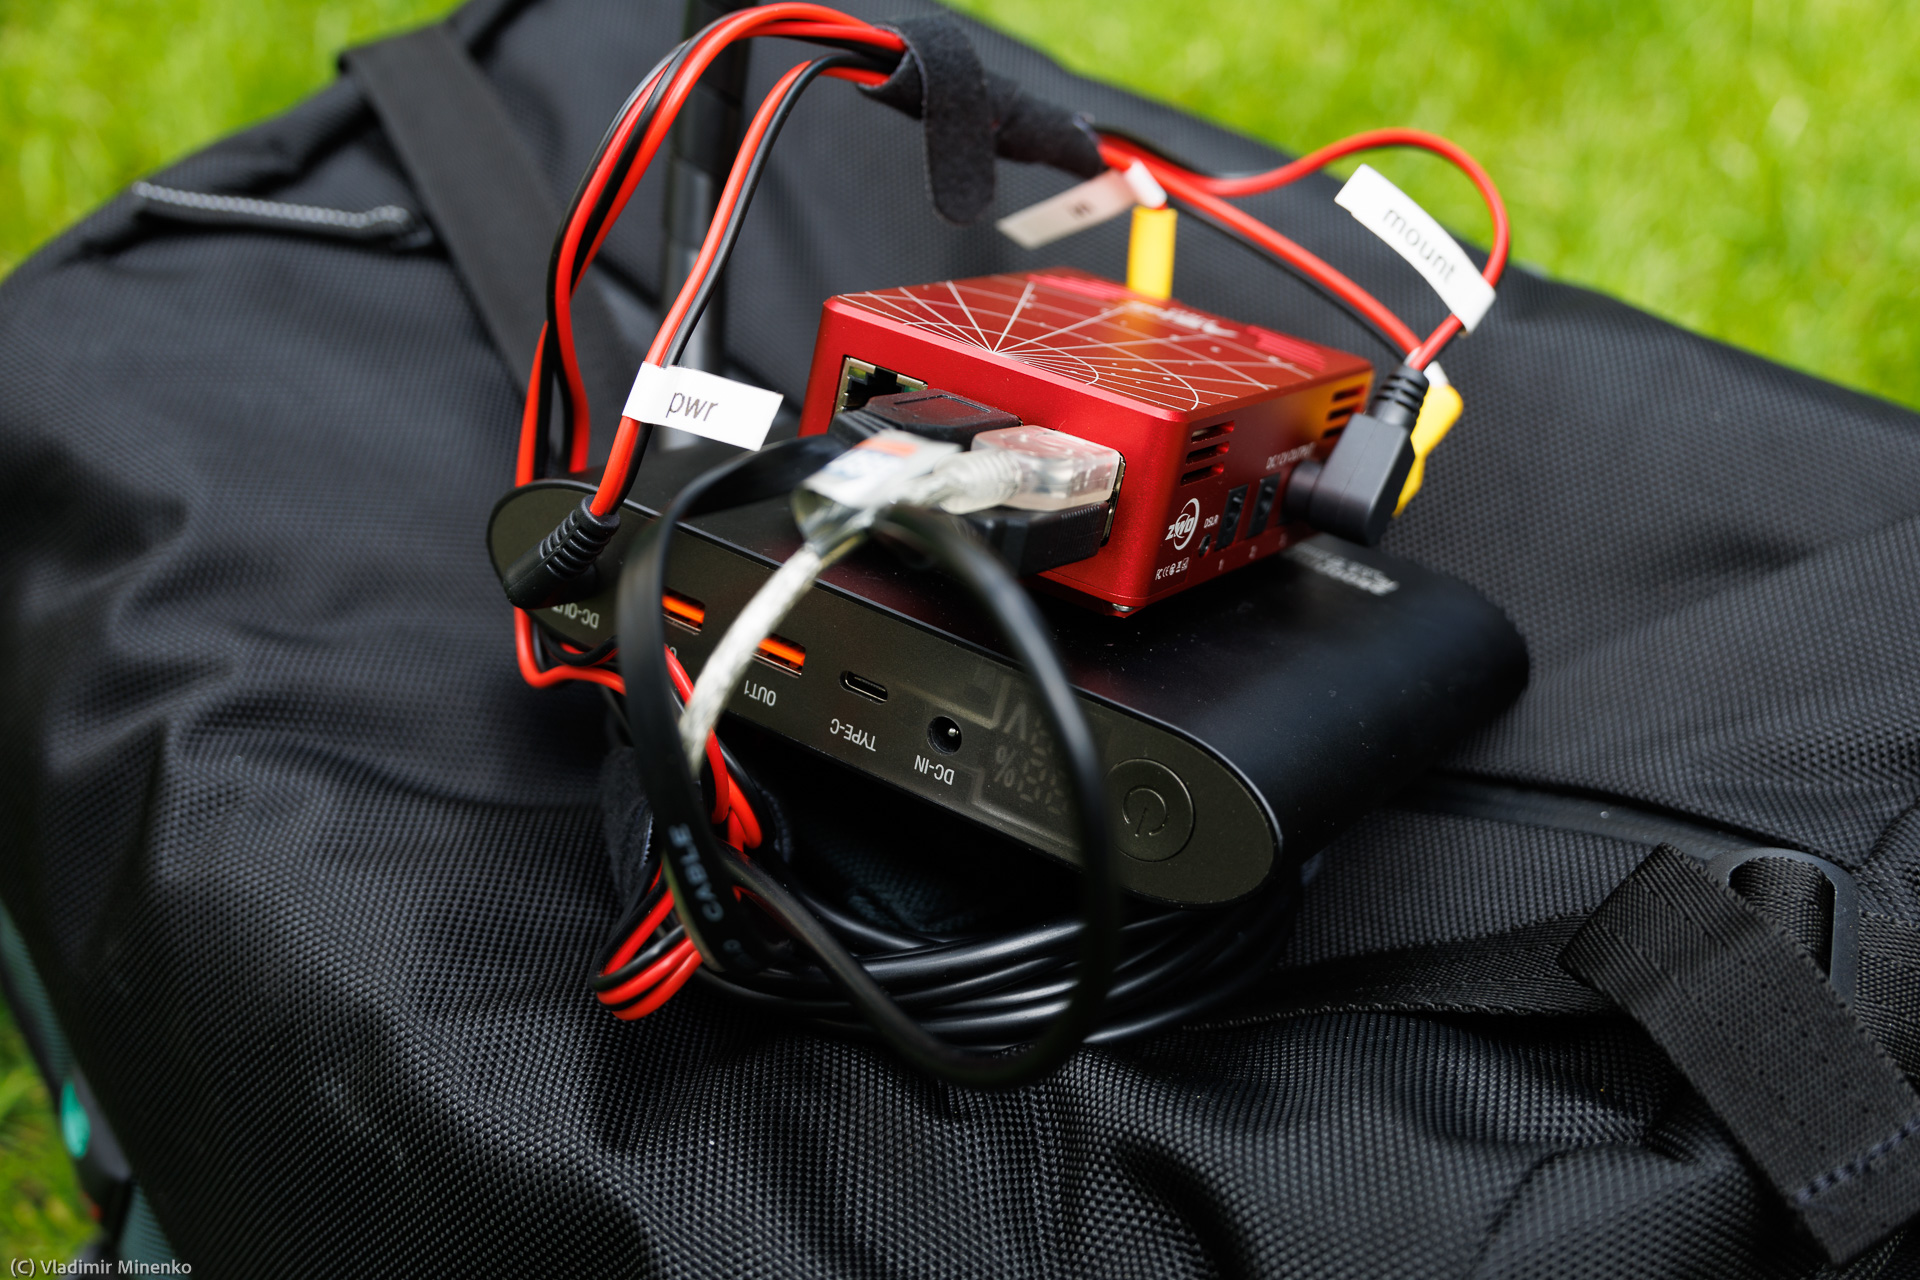
I once was reading somewhere on a forum that people see ASIAIR as a kind of game changer in astrophotography. I believe, it is not exaggerated. See my page Astrophotography in Field Without a Notebook for more details.
Cables: You Might Think “Why Bother?”
When you are done with first version of your setup spend some time for good cable management.

This is not a nice-to-have as I once thought! Cables tend to hang on obstacles. This can block the movement of the mount or even damage some parts being pull by stuck cables. In the cold weather, cables freeze and become stiff. This influences the precision of the movement of small and simple mounts and so negatively impacts guiding. Consolidate cables and put them in a warp. Make sure the cable strings move freely and can bend well when the mount moves. It just saves your time!
Getting the Right Focus with an Interchangeable Lens
Astrophotography demonstrate better than any other photography domain that there is no such thing as “focus on infinity”. This especially applies for focal lengths of 100mm and beyond. Focusing turns out to be one to one of the most time consuming steps.
When using a wide-angle or a normal lens, you can use some distant bright objects around you to focus. This does not produce good results with telephoto lenses and cannot be successfully used for super telephoto lenses at all. The same applies to large astronomy telescopes, but they have complex and expensive electronic focusing devices which analyze series of images to find the right focus point.
Fortunately, in 2005, the Russian amateur astrophotographer Pavel Bahtinov invented a pattern for focusing masks which is simple to make and use for almost all long focal lengths. Today, such masks are called after this name: “Bahtinov Mask”. Diffraction masks were known before, but Bahtinov found a pattern which produces the best results. A large number of different Bahtinov masks are offered on the market. Most of them are called “universal”, but use a pattern which fits the focal length of most telescopes: 700mm and longer. These masks do not work well with most interchangeable telephoto lenses. I bought one of those and was struggling with it for a while. See the page Using a Bahtinov Mask with a Telephoto Lens for more details why and what to do.
Dew Does Occur for Real and Can Spoil Your Plans
Unless you live in a desert, dew will occur and become a problem on colder days with higher humidity. A lens hood can prevent light dew. I very rarely use lens hoods for regular photography. For astrophotography, I always use them. One evening was quickly spoiled by a dense dew covering everything in just 30 minutes being outside. Since then, I always attach a lens hood.
In a case of a strong dew, a lens hood will not be enough. The only mean of prevention is to keep open lens surfaces warm. Consider buying a lens heater by time. The COOWOO brand available on Amazon is a good and an inexpensive choice.
Many weather websites show dew point temperatures in addition to regular weather parameters. It is a good help to assess what is coming up. If the dew point temperatures is in the range of the night temperature forecast , it is time to take lens heaters with you.

I meanwhile integrated two COOWOO lens heaters (one for the main camera and one for the guiding camera) into one cable harness on permanent basis and always have them on. With this I do not bother about dew forecast anymore and have less twiddling with additional cables.
A Question of Power
You will definitely need a portable rechargeable battery in the field. Due to a large amount of electronics in general use, there is a large choice of such batteries on the market. One thing is clear: a lead acid battery is a no-go. They are too heavy for the power they provide. Most portable batteries are broadly known as “powerbanks”. They are tailored for smartphones and do have not enough capacity for astrophotography. Other models are rather made to power an entire family while camping for weeks. Those are too heavy and too expensive.
Calculate the average power consumption of your setup and then double it for the future extensions and longer nights. It is a good idea to get a battery with 12V output and one which you can also charge in the car. Unfortunately, the latter is rare. A USB-C socket supporting Power Delivery (PD) is a handy option. A high (120/220V) voltage converter should have “pure sine wave” inverter. Cheap converts produce a plain pulse voltage which is not good enough for many modern devices.
My current setup with the Sky-Watcher AZ GTI consumes 8-13W on 12V, plus around 8W for dew heaters in average. I currently use Litionite Tanker Mini 90Wh battery as the main power source and a EC Technology 60Wh regular powerbank for dew heaters. In practice, it is enough for around 5-6 hours of constant operations at zero degrees Celsius. Larger mounts will consume far more power. For example the Sky Watcher EQM-35 consumes 6W in idle on 12V, 12W while tracking and 35W when moving in both axis at max speed.
If you consider buying a larger battery, be aware that you might not be able to take it on a flight. According FAA, for example, you have to get an approval from your airline for batteries larger than 100Wh and may not take more than two batteries of max. 160Wh each. This might considerably change your astrophotography vacation plans! 😉
Some Causes for Guiding Problems and How to Deal with Them
When all things are set and running, your major concern is how well the guiding will “behave” this night. This might sound awkward, but this and the passing satellites defines how may separate frames (subs) you will take home.
When using the Canon EF 100-400mm f/4.5-5.6L IS II USM at 400mm on an APS-C camera with a 120mm guide scope, I saw that total RMS errors higher than 2.5″ over a longer time results in a considerable reduction of the image quality. Using Sky-Watcher AZ GTI with the ZWO Mini Guide Scope (120mm) and ASI120MM-S camera as a guiding camera, it is possible to achieve total RMS errors lower than 1″ with a light and small lens, and lower than 2″ with a heavy and long lens. Certainly, with good seeing and no winds.
I learned that once your setup runs, almost any problems with guiding cannot and should not be solved by buying other and partially more expensive gear. A clear night is still not a guarantee that guiding will work well. If the gear is setup sturdy and aligned well, the seeing defines the quality of guiding and the quality of the result overall. If seeing is not good, but you expect more, you cannot do anything, you better go home and spend your time for something else.
This is a check list with points to pay attention to achieve better guiding. Most points are well known, but I did not see such a list on Internet so far. So I thought, I will make it:
- Make sure the tripod is leveled well. Check the leveling once more, after you fully loaded the tripod. Many mounts and tripods have cheap and imprecise bubble levelers. If the leveler does not move well, consider getting one with around 20 degree sensitivity. It is hard to use a leveler on a tripod with a sensitivity better than 20 degree. Not good leveling results in a drift of the guiding status curve. It resets to “normal” after each frame and later you observe again.
- Get the polar alignment far under 1′ of total error. 30″ are ideal. Remember, one of the tasks for guiding is to compensate polar alignment errors. A smaller polar alignment error will allow you to identify other causes for guiding errors.
- Adjust mechanics to achieve a good balance on both axis. Leave a very slight unbalance on each of the axis to make sure that gears in the mount are under a slight load. This reduces potential backlash.
- Make sure, cables or other parts cannot cause any tensions as the mount moves during tracking.
- The calibration of guiding should always be done on the object you want to image. You have to redo calibration each time you move away significantly. Take all calibration warnings serious and always re-start calibration after fixing the cause.
- Use longer (3-4 seconds) exposure times in bad seeing or when it is getting windy. This helps guiding to not be destructed by seeing conditions and winds.
- The best guiding star is not the brightest one. Such a star is medium sized and has possibly clear and sharp edges. Try to use a star in the center of FOV, i.e. where the guide scope has the best optical quality. Change the gain and the exposure so that more stars are visible, but they are not bloated by an overexposure.
- Watch the live preview of the guiding star occasionally. Ideally, the guiding star should not pulse, blink or change its shape a lot. If it does, it is a sign of a bad seeing. Sometimes, it might help to select another star. Still, the influence of seeing cannot be eliminated. A “Peak” value of 255 show in the guiding star monitor means that the star is completely overexposed. Ideal value is around 100-150. Reduce the gain in this case.
- Do not become too nervous and hectic on each splash of the guiding graph. Better watch for re-occurring problems and larger deviations over time.
- If total RMS errors still grow and re-occur in a pattern, check the points listed above again. Start with mechanical aspects first, like stuck cables, flexure, moved tripod legs, offset polar alignment.
- Only when all of the above is done, adjust settings for calibration times, aggressiveness parameters on both axis These values remain the same if you did not change the gear. But maybe you did… Do any changes with caution, memorize what you changed and the results of a change. Default values are good, but there are no universal ideal values. You have to find ones which are specific to your gear. Check this article by Craig Stark, the developer of PHD2 guiding software to understand the principles of auto-guiding better.
- If all of the above does not help, get another beer or a warm tee! It is a hobby! Review the weather forecast, memorize the no-go seeing values for this location at this time of the year 😉
Forget the Hand Controller and Stay Away from WiFi! EQMOD rules!
I use a self-made adapter EQMOD cable to connect ZWO ASIAIR Pro to the AZ GTI mount. Any larger mount comes with a hand controller. Computers, ASIAIR included, are supposed to be connect to this controller. Only a few mounts provide a direct connection. Initially, I had to use WiFi since the AZ GTI mount is not supplied with a hand controller. Later when ASIAIR arrived, I discovered a way to use a cable connection. In lack of experience, I started to explore a cable connection also because my place is very polluted by numerous WiFis. In this, the simple WiFi implementation in AZ GTI failed to connect reliably. Switching over to cable was a kind of blessing at the end, so much was simplified. By time many other details why this ways is the best became apparent as well. Today, I would always stay away of using WiFi for any critical connection in astrophotography. I case I buy another mount, it has to a support a direct cable connection to ASIAIR or another computer.
0 Comments